
That bag of peppers in your fridge is on borrowed time. Instead of watching good food turn slimy, you can turn it into something that lasts for months using nothing but your oven. A little prep and low heat are all it takes to stock your pantry with homemade oven-dehydrated vegetables.

Benefits of dehydrating vegetables
Dehydrating vegetables keeps them fresh long after they’d normally go bad. Without relying on the freezer, you can have ingredients ready for soups, stews and snacks any time of year. That means less waste and fewer last-minute grocery runs.
Dried vegetables are also easy to pack and carry. You can take them camping, hiking or stash them in your bag for quick snacks. They’re lightweight and take up very little space, so you can fit way more in your pantry than you ever could with bulky fresh produce.
When done correctly, the process keeps a lot of a vegetable’s vitamins and minerals intact. You still get the nutritional benefits without worrying about spoilage. It’s an easy way to have wholesome ingredients on hand, no matter the season.
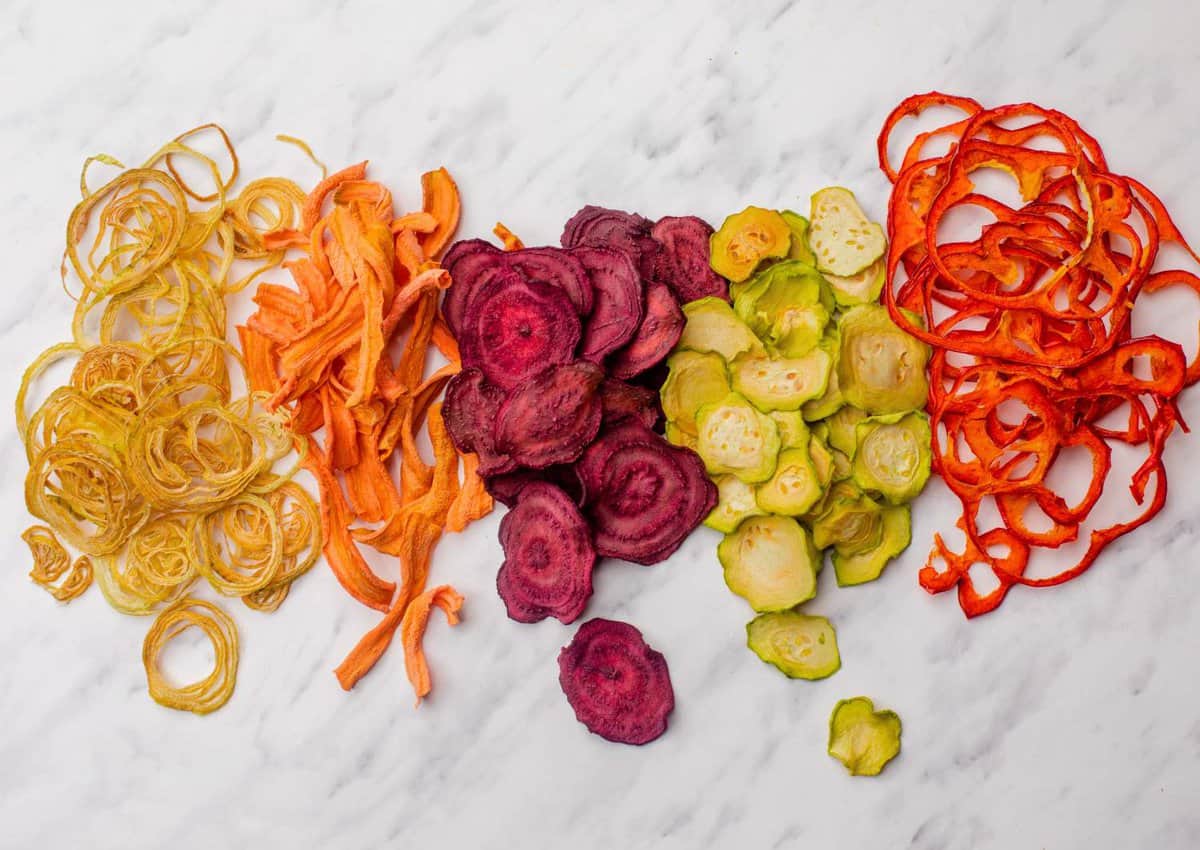
Choose the right vegetables
Some vegetables handle dehydration better than others. Carrots, zucchini, tomatoes, bell peppers, eggplant, kale, onions and mushrooms are popular choices because they keep their flavor and texture after drying. Leafy greens shrink quite a bit but still work well for soups or as crunchy snacks, and kale in particular makes great chips when seasoned before drying.
A few vegetables need extra attention before they go in the oven. Potatoes, green beans and broccoli benefit from a quick blanch in boiling water, which helps them keep their color and texture during storage. If you’re new to dehydrating, start with simple options like mushrooms or tomatoes before working up to the ones that need more prep.
Prep vegetables for dehydration
Before sliding anything into the oven, you’ll need to prep your vegetables a certain way. Proper preparation ensures even drying, better flavor and a longer shelf life. Here are a few basics to cover first:
- Wash vegetables well to remove dirt and any residue.
- Dry them thoroughly with a clean towel to keep excess moisture from slowing the drying process.
- Slice them into even pieces so they all dehydrate at the same rate, preventing some from overcooking while others stay soft.
Some vegetables benefit from a quick pre-treatment before going in the oven. Blanching helps keep colors bright and textures firm but chewable, especially for produce like carrots, green beans and broccoli. For vegetables that tend to brown, such as potatoes or apple slices, if you’re mixing in fruit, a dip in lemon juice or a solution of ascorbic acid and water can help them keep their color. Taking the time to prepare them properly will give you better flavor, appearance and shelf life.

Set up and run the oven for dehydration
The way you prepare your oven before the vegetables go in will affect how evenly and thoroughly they dry. Low, steady heat and good airflow are the two most important factors. Taking a few minutes to arrange your setup properly will help you avoid vegetables that are half crisp and half soggy.
Here’s how to get the oven ready:
- Set the temperature to the lowest setting, ideally between 125 and 150 degrees Fahrenheit. If your oven doesn’t go that low, use the lowest setting available and keep a close watch.
- Use baking sheets and, if possible, place wire racks inside them for better airflow.
- Line racks with parchment paper for smaller pieces so they don’t fall through while still allowing moisture to escape.
- Prop the oven door open slightly with a wooden spoon or other heat-safe utensil to release steam and maintain steady airflow.
How to dehydrate vegetables in the oven
Once the oven is ready, it’s time to start the drying process. The goal is to keep the vegetables in a consistent environment where moisture can escape without cooking them. This is where timing, tray placement and regular checks come into play.
Arrange the vegetables in a single layer so no pieces overlap; crowding traps steam and slows drying. You’ll also want to rotate the trays a few times during the process to give everything equal exposure to heat.
You can expect drying times to range from two to 12 hours, depending on vegetable type, slice thickness and moisture content. Check for doneness by touching a few pieces. They should feel crisp or leathery with no visible moisture. Let the vegetables cool completely before transferring to storage containers to prevent condensation.
Drying time guide for common vegetables
Drying times vary based on the type of vegetable, how thick you slice it and how much water it contains. Oven performance can also make a difference; make sure to check for texture rather than relying only on the clock.
Vegetables are ready when they’re crisp or leathery with no visible moisture. For carrots, this may take up to 10 hours, whereas for a leafy green like kale, you’ll only need two to three hours. Most vegetables will fall somewhere in the middle, requiring five to seven hours in the oven.
How to store dehydrated vegetables
Once your vegetables are completely dried and cooled, proper storage will keep them fresh for months. Any remaining warmth or moisture can lead to condensation, so make sure they’ve cooled to room temperature before sealing them.
Store them in airtight containers, glass jars with tight-fitting lids or vacuum-sealed bags to protect them from air and humidity. Keep the containers in a cool, dark place away from direct sunlight, which can fade color and flavor. For larger batches, divide them into smaller portions so you only open what you need, keeping the rest sealed for longer.
Add a food-safe moisture absorber to help extend shelf life, especially if you live in a humid climate. Always label your containers with the type of vegetable and the date they were dried. Most will last up to a year when stored this way, though rotating them every few months will keep everything at peak quality.

Make the most of dehydrated vegetables
Dehydrated vegetables are easy to work into everyday meals. Rehydrate them by soaking in warm water for 10-20 minutes, or add them straight to soups like this wild mushroom soup that uses both fresh and dried mushrooms, stews and sauces where they’ll absorb liquid as they cook. They make great camping and hiking food since they’re lightweight and don’t require refrigeration.
You can grind dried vegetables into powders for seasoning mixes, blend them into sauces or keep them as is for crunchy snacks like kale chips or zucchini crisps. Having a variety of dried vegetables on hand means quick meals, less waste and more ways to enjoy produce throughout the year.
Why oven drying is worth the effort
Drying vegetables in the oven takes time, but the payoff goes beyond a stocked pantry. You get control over the ingredients you keep on hand, avoid unnecessary additives and make the most of every bit of produce you buy or grow. It’s a low-cost skill that turns what might have gone to waste into something you can use in dozens of ways.
This article originally appeared on Food Drink Life.
Gina Matsoukas is an AP syndicated writer. She is the founder, photographer and recipe developer of Running to the Kitchen — a food website focused on providing healthy, wholesome recipes using fresh and seasonal ingredients. Her work has been featured in numerous media outlets both digital and print, including MSN, Huffington post, Buzzfeed, Women’s Health and Food Network.