
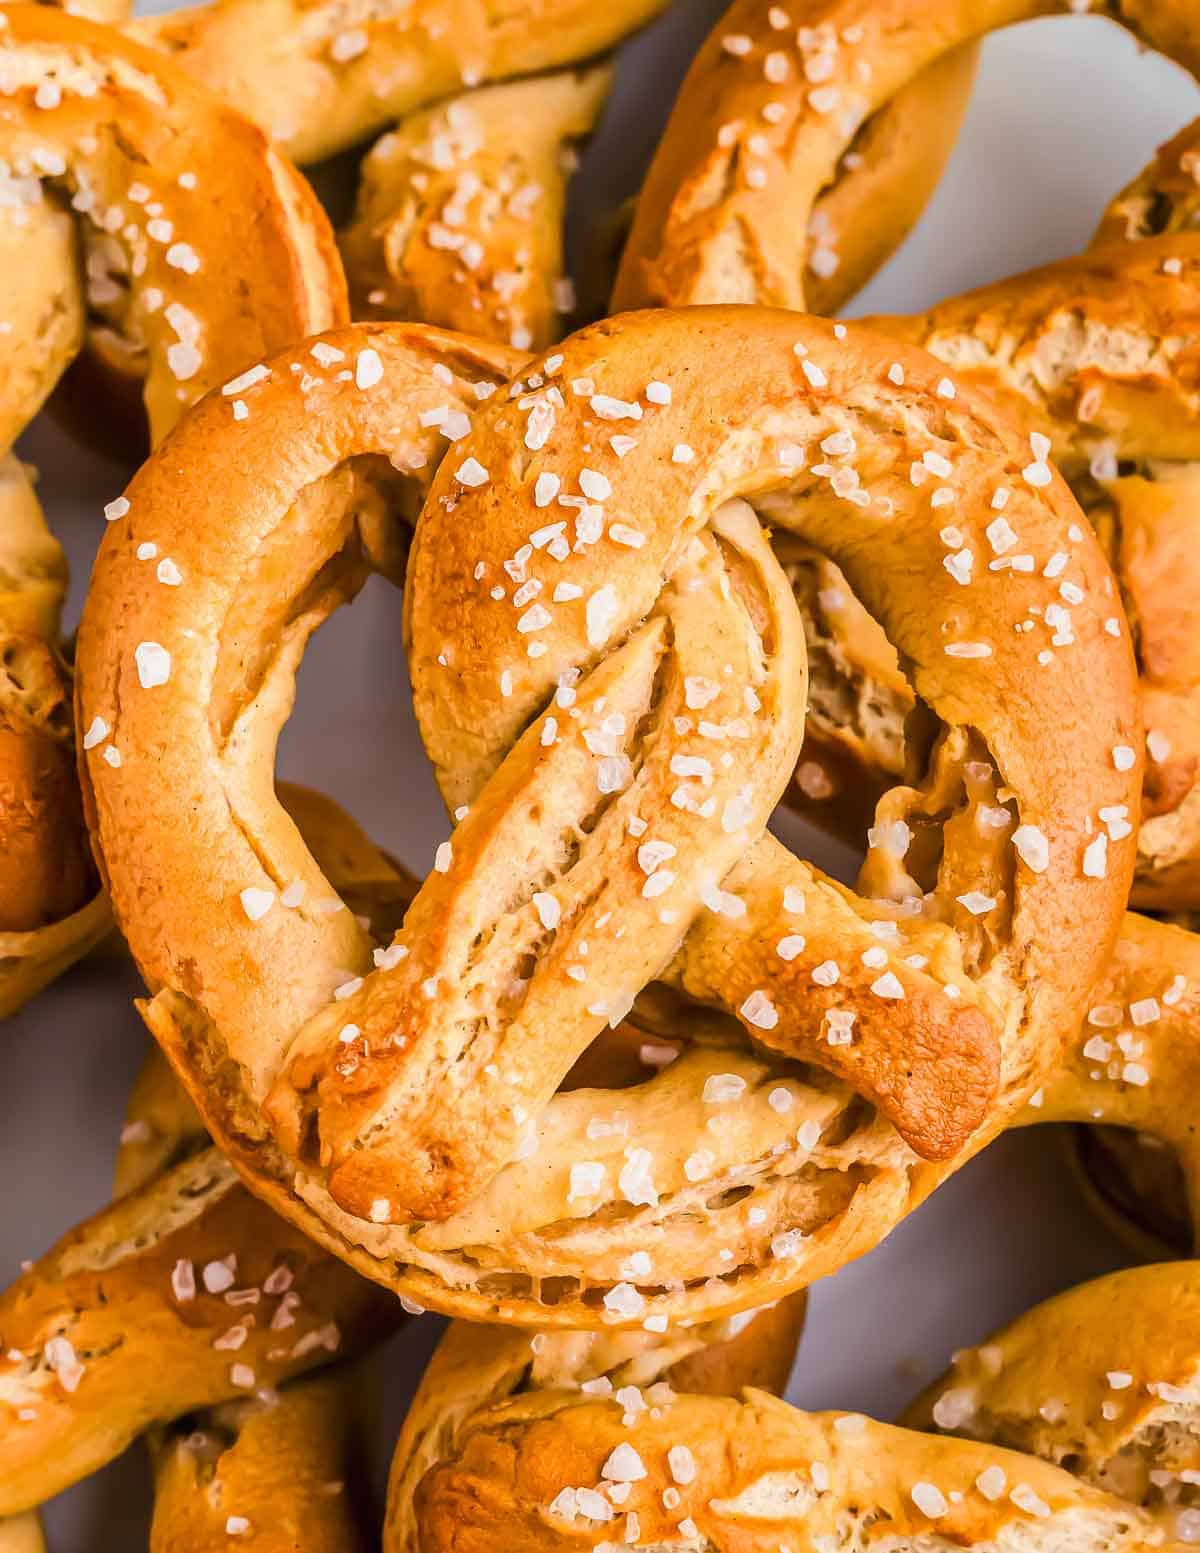
These gluten free soft pretzels are everything you love about a classic pretzel whether it’s from the mall or a city street vendor. This recipe was perfected so that soft, chewy addictive pretzel texture and taste is possible using gluten-free flour without missing a beat. Follow this easy step-by-step recipe and these dreamy soft pretzels will be ready in just over an hour.
This recipe is near and dear to my heart. Both my husband and I have a serious love affair with soft pretzels. Living in rural New York, there’s not much in the way of restaurants nearby. There are quite a few breweries, however, and we’ve become “regulars” at one of them.
Every Friday late afternoon, you can typically find us at Ommegang Brewery in Cooperstown, NY hoping their rotating menu includes the brewer’s board that day — a charcuterie inspired spread of goodies with a huge soft pretzel serving as the centerpiece.
This pretzel is everything a soft pretzel lover dreams of — a crispy exterior with just enough salt and a doughy, chewy center that alone explains why I don’t think I’d ever be able to successfully do the carnivore diet.
Eating mostly gluten-free, a few bites of this pretzel is my weekly “cheat.” Recreating this soft pretzel in gluten-free form has been on my must-make list for over a year and it’s finally ready to share after a bunch of trial and error.
These gluten free soft pretzels are the real deal. They’re everything you love about a “real” pretzel in gluten-free form. I don’t say this lightly because we all know there are way too many gluten-free imitators out there that do not live up to their gluten-filled counterparts. I was not about to share this recipe until it was solid, so take my word when I say it is.
Pretzels and stuffed pretzel bites are a bit of a step-by-step process but there’s nothing inherently difficult about making them. I’ve included pictures of each step so you can follow along in the process. Once you’ve made them, you’ll wonder why you ever thought they were complicated.

Here’s What You’ll Need
Gluten free all-purpose flour — I used King Arthur measure for measure gluten-free flour for this recipe as I do most of my gluten-free baking. Every GF flour blend is a little different and will act differently in a recipe so I suggest using this specific one for these pretzels for guaranteed results.
Baking soda — This is used both in the pretzels for rise and in the water bath when they’re par-cooked.
Salt — It’s important to add a bit of salt to almost any baking recipe to bring out the flavors.
Xanthan gum — This is probably the most important ingredient in this gluten free pretzel recipe. I tried it without since the gluten-free flour blend already has it included in the ingredient list, but every time the pretzel texture was too crumbly and would not stay together well enough. Do not skip this ingredient. It’s crazy how such a tiny amount of something makes such a huge difference in the final outcome.
Brown sugar — The addition of sugar to the dough gives the yeast something to feed on and activate. It also adds a nice deeper flavor to the taste of the pretzels.
Salted butter — Using salted butter in the dough adds more flavor to the pretzels. The butter also makes the dough silky in texture and a dream to knead.
Eggs — One egg is used to make the pretzel dough while the other becomes a wash for that authentic golden brown soft pretzel color.
Warm water — Use filtered water that’s between 100 – 110°F to help activate the yeast. You can use a digital thermometer to make sure the temperature is exact. Over 115°F will kill the yeast.
Instant yeast — Making sure your packet is fresh and not expired is the most important tip for working with yeast. It’s simple yet often overlooked.
Olive oil — A generous amount of olive oil is used to grease the bowl the dough will proof in as well as help keep the dough moist while you shape the pretzels.
How to Make the Gluten Free Soft Pretzels
You’ll need a few pieces of equipment to make soft pretzels:
Make sure to read the detailed recipe card at the bottom of this post for more notes and tips.
Make the Dough
Start by combining the flour, salt, baking soda, xanthan gum, brown sugar, softened butter, yeast and one egg in the bowl of a stand mixer. Slowly add the warm water.
Affix the dough hook to the mixer and slowly begin to mix on a low speed. Once everything is combined, gradually increase the speed to medium-low and mix for about 3 minutes. The mixture should be well blended and smooth with a slightly sticky texture.


Let it Proof/Rise
Generously oil a large bowl. Form the dough into a ball and transfer to the bowl. Cover the top with plastic wrap and place the bowl in a warm spot for about 40 minutes to rise. The dough should grow slightly larger and look airy when it’s ready.

Shape the Pretzels
Preheat the oven to 425°F once the dough has risen.
Fill a large pot with 10 cups of water and 1/2 cup of baking soda and bring to a boil. Whisk the remaining egg in a small bowl and set aside to use as an egg wash.
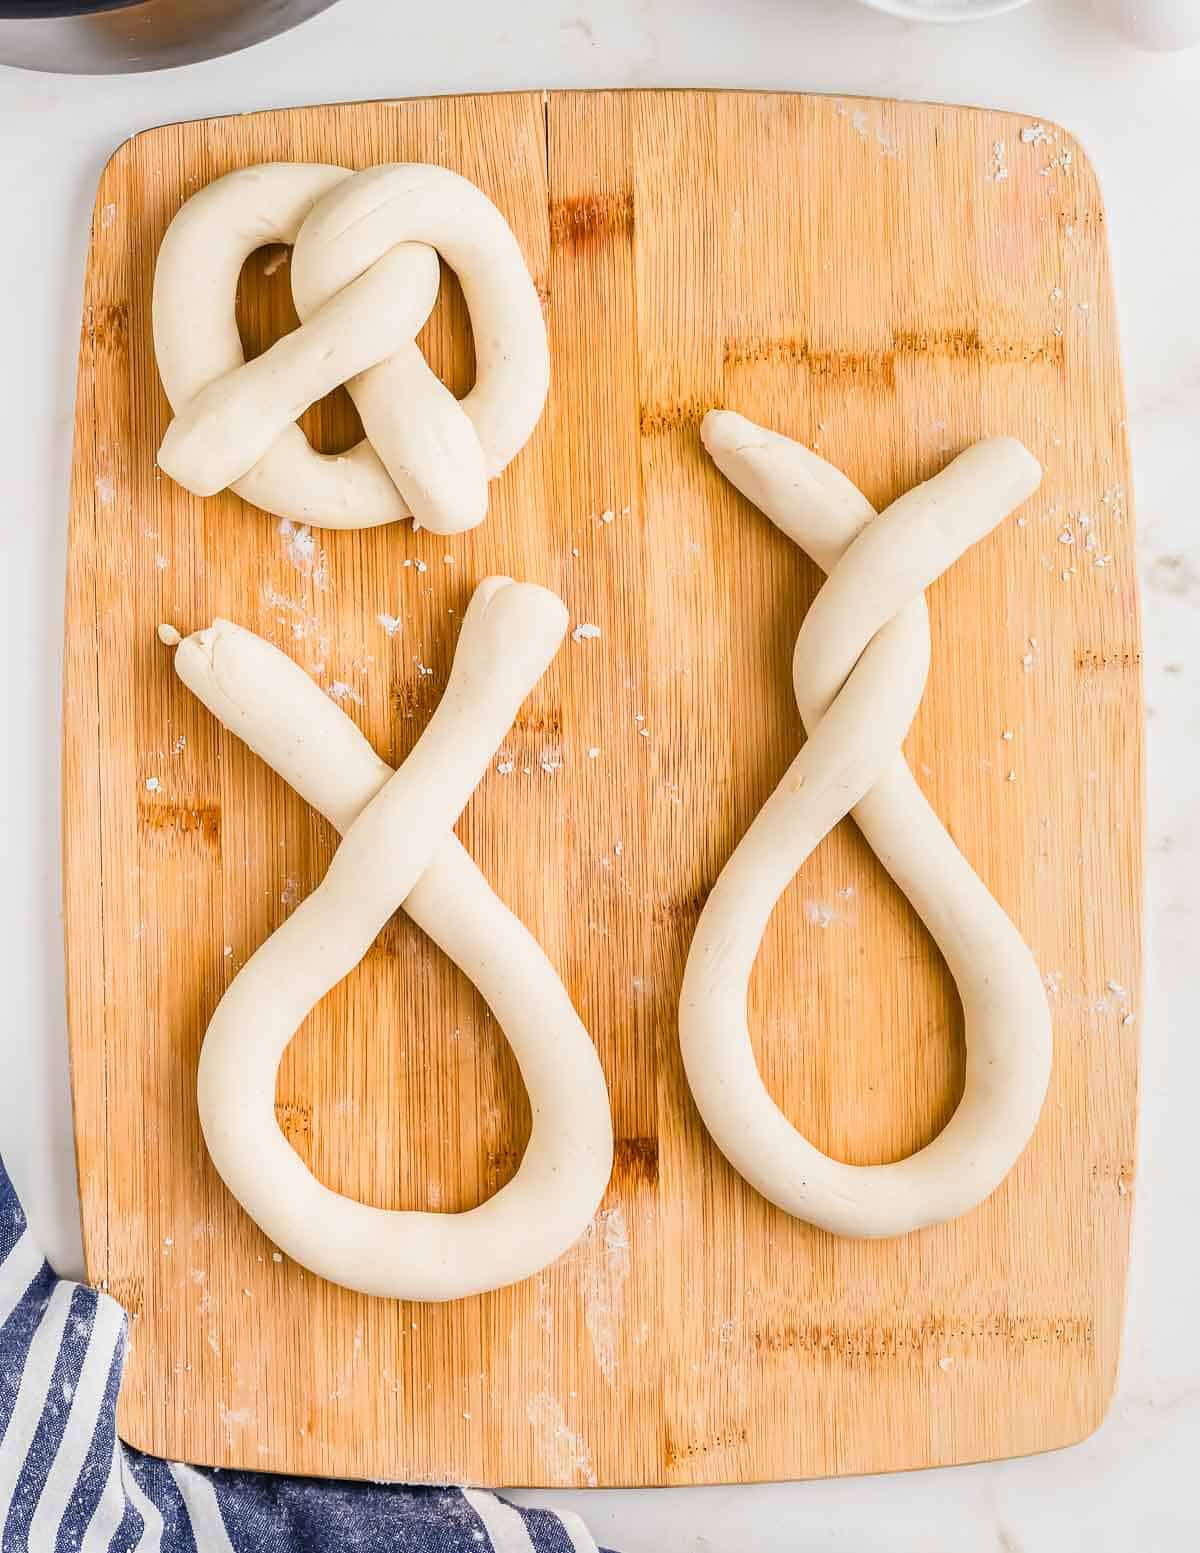
Lightly flour your work space and transfer the risen pretzel dough out on top. Knead the dough for about 2 minutes then reform into a ball. Use a bench scraper or sharp knife to cut into 8 equal portions.
My Pro Tip
Recipe Tip
This is where a food scale comes in handy. Weigh the dough ball before dividing into sections so you have a total weight. Divide that by 8 to know how much each section should weigh to ensure the pretzels cook evenly.
Roll one piece out at a time into a rope shape about 18 inches long and 1 to 1.5 inches wide. Form into a pretzel shape (see the pictures below and notes in the recipe card).

Boil in a Baking Soda Bath
Gently lower the pretzel into the boiling water bath. It will immediately sink but then quickly rise to the top. Once it’s risen to the top, let it boil for 25-30 seconds then remove with a slotted spoon. Let the excess water drain off as much as possible, then transfer to a baking sheet lined with parchment paper.

Egg Wash, Salt and Bake
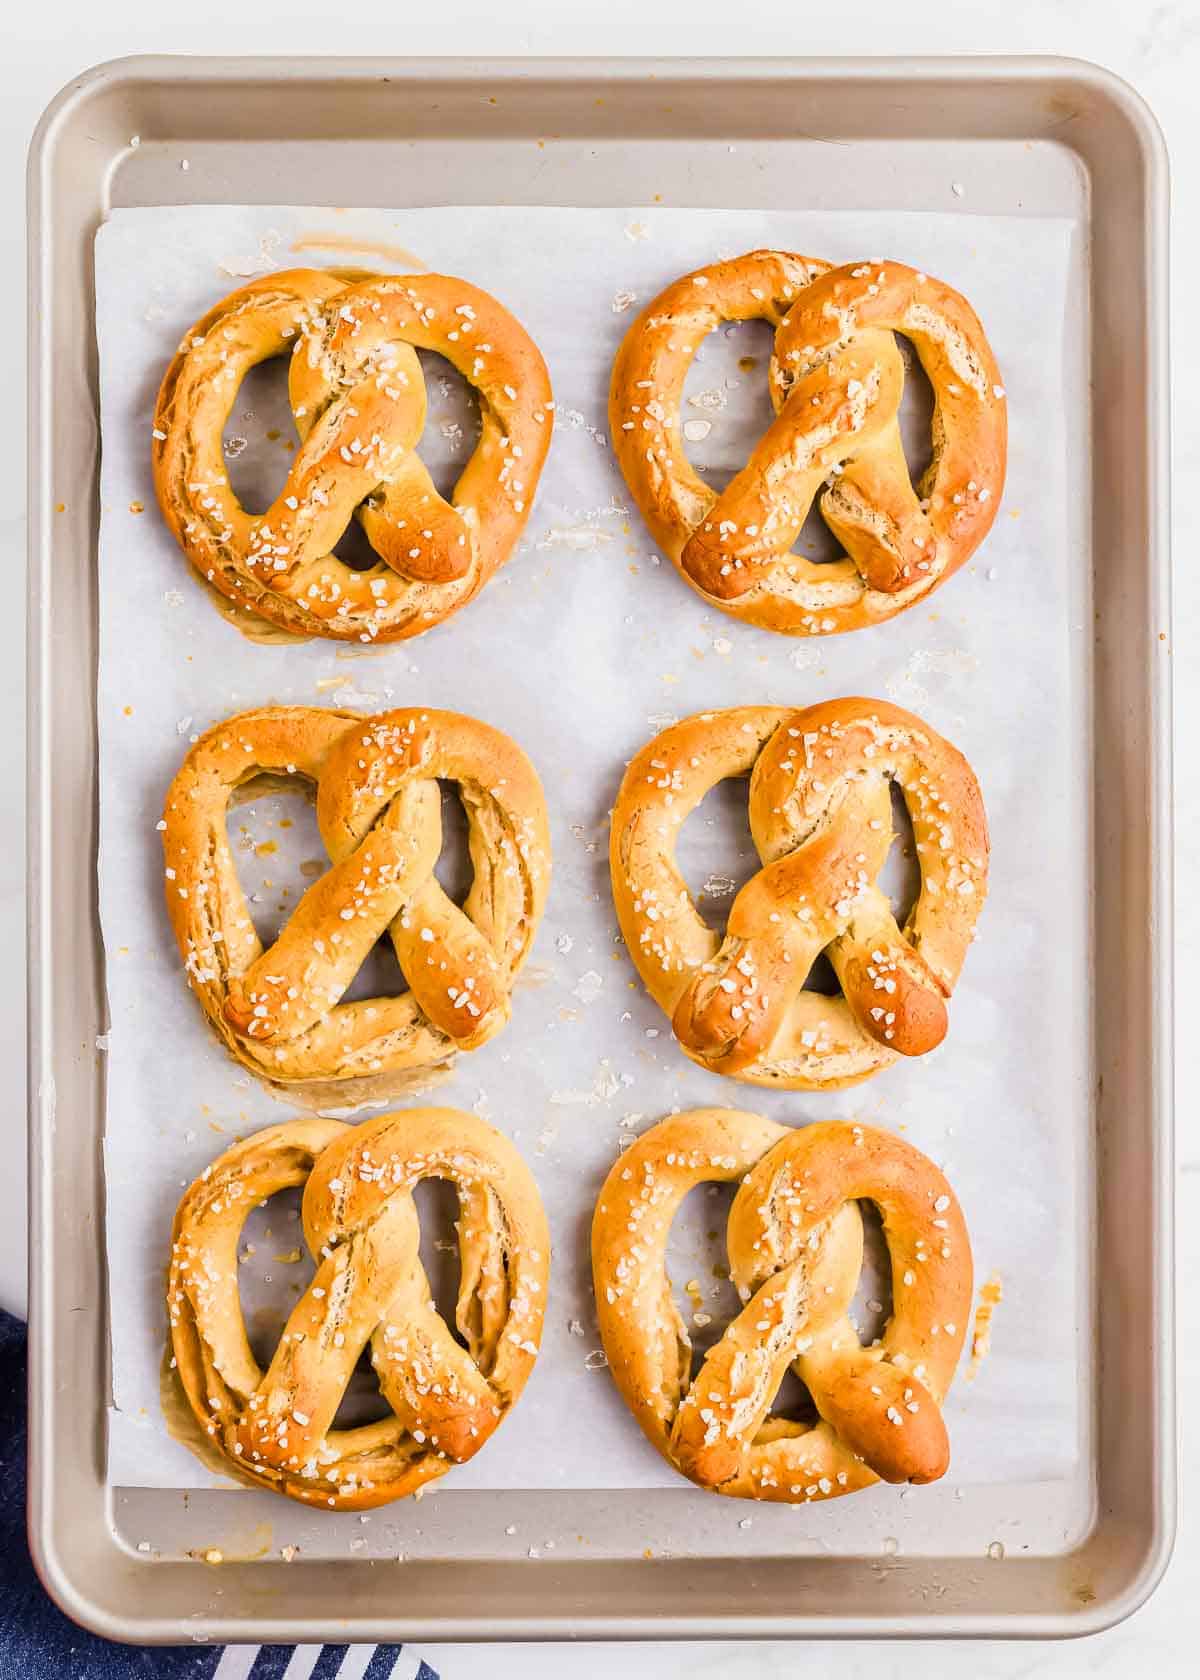
Brush the pretzel with the egg wash then sprinkle with coarse salt. Repeat this process for the remaining 7 sections of dough. Once all the pretzels are on the baking sheet, bake them in the oven for 15-17 minutes until golden brown. Rotate the sheet pan half way through baking for even cooking and browning.
Allow the pretzels to cool slightly on the baking sheet before transferring them to a cooling rack. Enjoy warm with a cheese dip or plain.

Topping Options
I suggest starting with a classic salted pretzel when you make these gluten free soft pretzels for the first time, but after that, play around with different flavors and topping ideas. Here are some to try:
- Cinnamon sugar — bake the pretzels plain (with just the egg wash) then once they’re out of the oven, brush them with butter and roll them in a cinnamon sugar mixture. Check out these apple cinnamon pretzel twists for something similar.
- Garlic butter — brush this on the pretzels once out of the oven.
- Everything seasoning — sprinkle this on the pretzels after the egg wash and before baking.
- Garlic salt — use in place of coarse salt before baking the pretzels.
- Cheese — instead of serving with a cheese sauce, make cheesy pretzels! Top the boiled pretzels with your favorite grated cheese before baking. Just keep an eye on it when baking so it doesn’t burn. You may want to loosely tent foil on top of them if the cheese browns too quickly.

The Most Important Step For Chewy Soft Pretzels
There’s a reason pretzels are made in two distinct steps of boiling and baking and that’s because of their resulting texture.
Do not be tempted to skip the boiling step. It may seem crazy that 30 seconds in boiling water with baking soda makes such a difference in the texture of a cooked pretzel, but it does!
If you want that soft, chewy, doughy center to the pretzel, you have to do this step.
Traditional Bavarian style pretzels require a lye bath which gives them a deep dark color. A baking soda bath is a more American-style approach and much more friendly for the home cook. It results in a softer and lighter colored pretzel.
How to Store the Pretzels
Like almost any baked good, the pretzels are best right out of the oven or on the day they’re baked. You can store any extras in an air-tight container on the counter at room temperature for 1-2 days. Reheat them before serving either in the oven or the microwave to return some of their softness that will have been lost.

I really hope you love this recipe as much as I do. You have everything you need to make the BEST gluten free soft pretzels and not feel like you’re missing out on one of the best quintessential American foods out there!
Gluten Free Soft Pretzels

Ingredients
For the Pretzels
- 4 cups of Gluten Free All-Purpose Flour, plus extra for rolling, about 1 cup
- ½ teaspoon salt
- 1 teaspoon baking soda
- 1 ½ teaspoons xanthan gum
- 2 tablespoons brown sugar
- 2 tablespoons salted butter, softened
- 2 eggs, divided
- 1 ¾ cups warm water, Between the temps of 100°F and 110°F
- 1 packet of instant yeast, about 2 and ¼ teaspoons; I used Fleischmann’s RapidRise Fast-Acting
- extra virgin olive oil, for proofing the dough
Water Bath
- 10 cups water
- ½ cup baking soda
Topping Ideas
- Coarse sea salt or pretzel salt
- Cinnamon sugar
- Garlic butter
- Garlic salt
Instructions
- Begin by combining the flour, salt, baking soda, xanthan gum, brown sugar, softened butter, yeast and one egg in a large mixing bowl. Next, add the warm water to the dry mixture. Using a dough hook on a stand or handheld mixer, begin to slowly mix the ingredients together. Once everything has been combined, gradually increase the speed to a medium-low and allow it to continue to mix for about 3-4 more minutes. The mixture should be well blended and in a slightly sticky, but smooth dough.
- Gently form a loose ball and transfer the dough to an oiled bowl. Cover the bowl with saran wrap, or your choice of cover, place the bowl in a warm area, and allow the dough to rise for 40 minutes (see notes for tips on this). The dough should grow slightly larger and airy.
- At the end of the 40 minutes, preheat the oven to 425°F. Then, create the water bath by adding the water and baking soda to a medium or large pot and bring it to a boil. In a small bowl, vigorously whisk the second egg and set it to the side. This will be used to brush the tops of the pretzels before baking.
- Lightly flour your workspace and place the whole dough ball in the center. Knead the whole bread for about 2 minutes. Form a ball shape with the dough again. Using a bench scraper, cut the dough ball into 8 equal sections. I highly recommend you work with one section at a time. Keep the remaining 7 sections in the oiled bowl and keep them completely covered to help prevent any drying out.
- Continue to knead the small piece of dough on the lightly floured surface for another minute. With your hands, begin to roll the dough into a long and narrow rope. As you roll, be sure to continuously keep the counter lightly floured. Over-flouring will cause the dough to become too dry and crack or break, so only do a little bit at a time. If the dough is too sticky, see my notes for a suggestion on how using oil could help with this.
- Roll the dough to be about 1 to 1.5 inch this and about 18 inches long. Bend the ends of the rope upwards until they meet. Gently do a twist at the top and then fold downwards towards the bottom of the pretzel. Carefully, readjust the pretzel if needed so the twist is perfectly centered and the pretzel is equal on both sides. Connect the ends of the twist to the bottom of the pretzel by using a dab of water to help make them stick.
- Very carefully place the pretzel into the boiling water bath. The pretzel will immediately sink, but will float to the surface within 5 seconds. Once the pretzel reaches the surface, let the pretzel sit in the boiling water for an additional 25 seconds. Remove the pretzel using two slotted spoons making sure to allow as much of the water to drip as possible. Place the pretzel on a baking sheet lined with parchment paper. Using a pastry brush, brush the beaten egg on the top of the pretzel and immediately sprinkle the salt. The salt should stick to the egg.
- Once you have finished the first pretzel, repeat the previous step until all 8 pretzels are made, salted, and on the baking sheet. Place the baking sheet in the oven for 15-17 minutes rotating the baking sheet halfway to ensure evenly browning and baking.
- Remove from the oven and allow the pretzels to slightly cool. Enjoy them on their own or with a cheese dip.
Notes
Nutrition
Nutrition information is automatically calculated, so should only be used as an approximation.

Gina Matsoukas is an AP syndicated writer. She is the founder, photographer and recipe developer of Running to the Kitchen — a food website focused on providing healthy, wholesome recipes using fresh and seasonal ingredients. Her work has been featured in numerous media outlets both digital and print, including MSN, Huffington post, Buzzfeed, Women’s Health and Food Network.


What can you use instead of xantham gum? Husband allergic to it…
There is none unfortunately. It’s a pretty important ingredient in gluten-free baking and crucial for this recipe so I don’t have a tested alternative to recommend for you. Sorry.