
This white kitchen remodel went from dark cherry cabinets and a closed off space to an open, bright space with white cabinets and reclaimed wood shelving.
Home Depot was kind enough to give me a small stipend to use towards the purchase of the Sharp drawer microwave we used in this renovation.

It’s been almost exactly a year since we finished our kitchen remodel and I’m finally getting around to sharing some of the details of the completed space and information on sourcing.
But before we even get into that, let’s take a look at the kitchen space before all this.
THE KITCHEN BEFORE
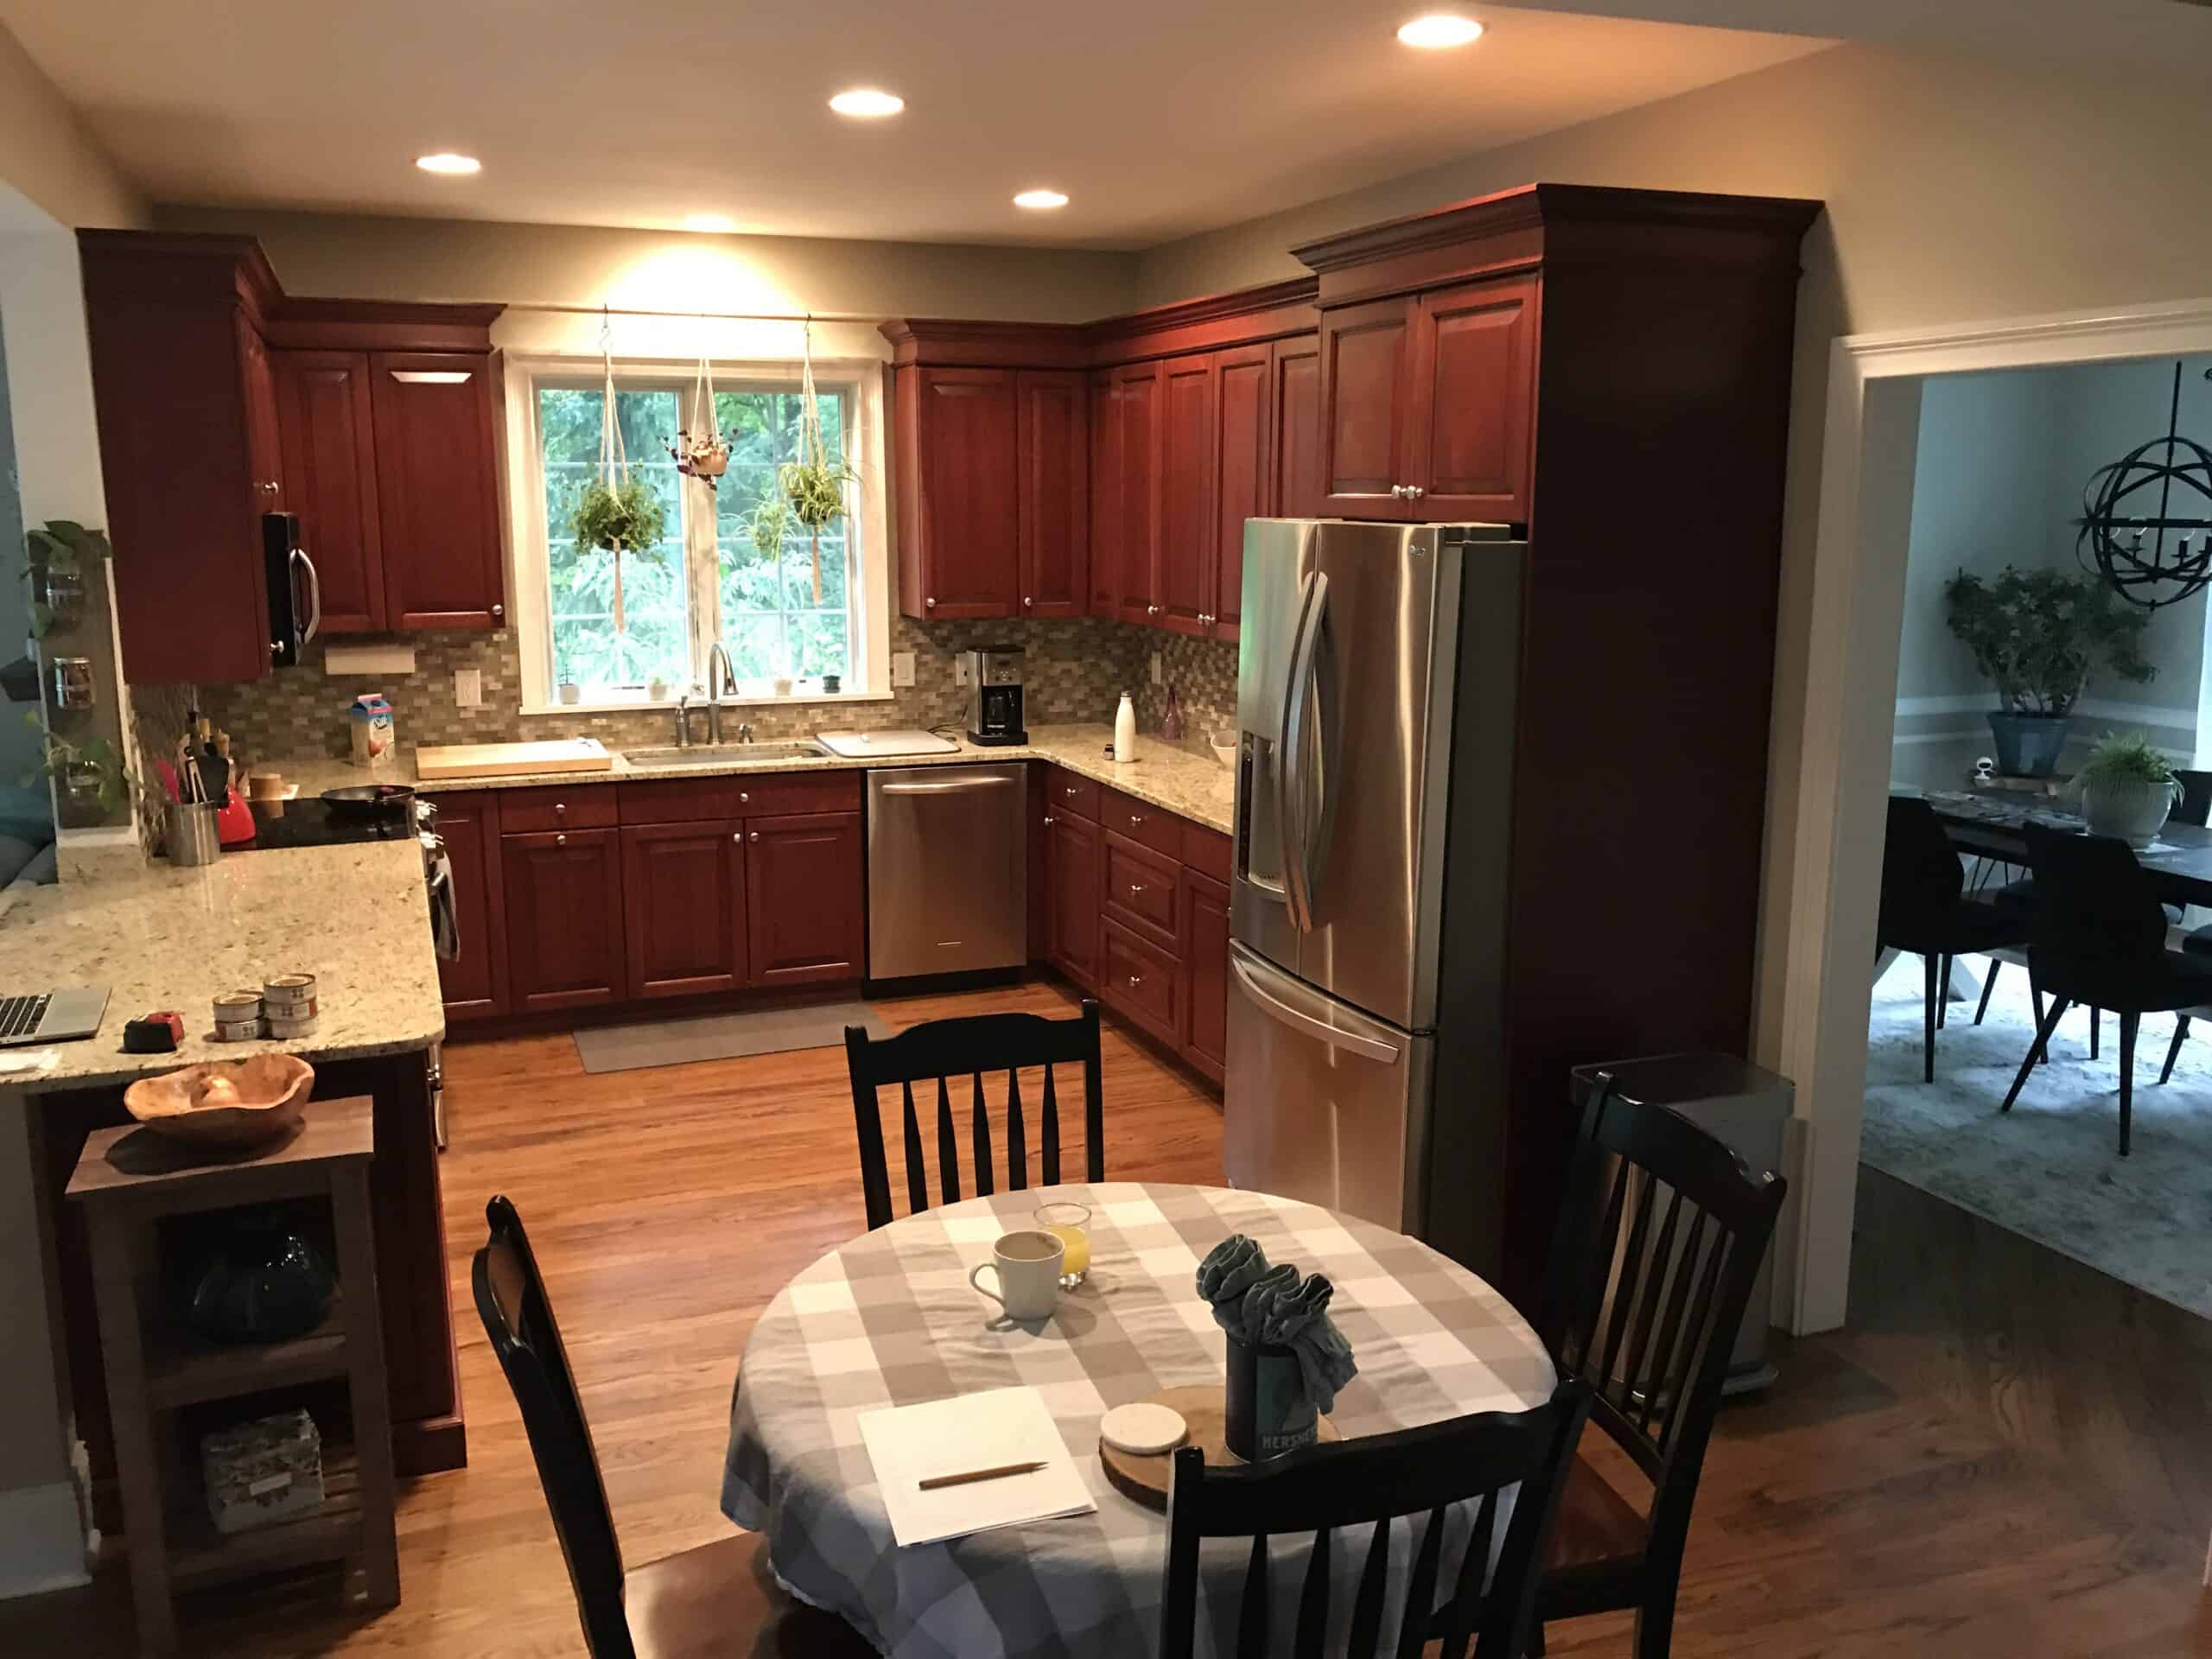
Our house was built in 2006 and the kitchen showed every bit of the mid-2000s.
With dark cherry cabinets (a lot of them though so I can’t say I ever longed for storage or counter space) and that brownish/speckled granite, our kitchen was basically the poster child for the early to mid 2000s.
Honestly, it wasn’t horrible and I said many times that if I didn’t spend most of my day in this room, it wouldn’t be worth doing the renovation.
But I do and we’re likely going to be in this house for another 12 years until Ulysses can retire so I wanted it to be a space I enjoyed being in every day.
I’ve never understood why people renovate right before they sell versus having done it while they lived there so they could enjoy the investment!
*Update – we moved (ha!) in June 2022 and renovated another kitchen in our new house! Check out the ZLINE appliances we chose.
WHITE KITCHEN REMODEL PRIORITIES
- Remove wall separating the dining room
- Upgrade to 36” dual fuel stove with vent hood
- White cabinets
- Fewer upper cabinets
PRIORITY #1: REMOVE WALL SEPARATING KITCHEN & DINING ROOM
You can see from the before shot how much the wall between the kitchen and the dining room impacted the light in the kitchen.
The dining room faces south so it’s a very bright and warm room during the day.
With the kitchen sandwiched between the dining room and the family room in the house with just one east facing double window, it was a very dark space. The only time of day the kitchen was somewhat bright was first thing in the morning. If it was a cloudy dark day, especially in winter, it would be almost pitch black in the kitchen without lights on.
Tearing down that wall was my number one priority. It was also the most complex piece of the whole remodel.
Of course, it was a major load bearing wall and taking it down required architects and engineers to figure out the details. The result was a lot of support beams and posts not only in the kitchen (they’re hiding under that shiplapped soffit) but also in the basement directly below to support the load.
The renovation lasted about 3 months start to finish and the entire first 4 weeks were solely dedicated to taking down this wall, building a temporary wall and then getting the beams and posts in place. Along with rerouting the plumbing and electrical that were in it.
But the added light that now fills the space from the southern facing windows in the dining room were totally worth the effort (and expense!).
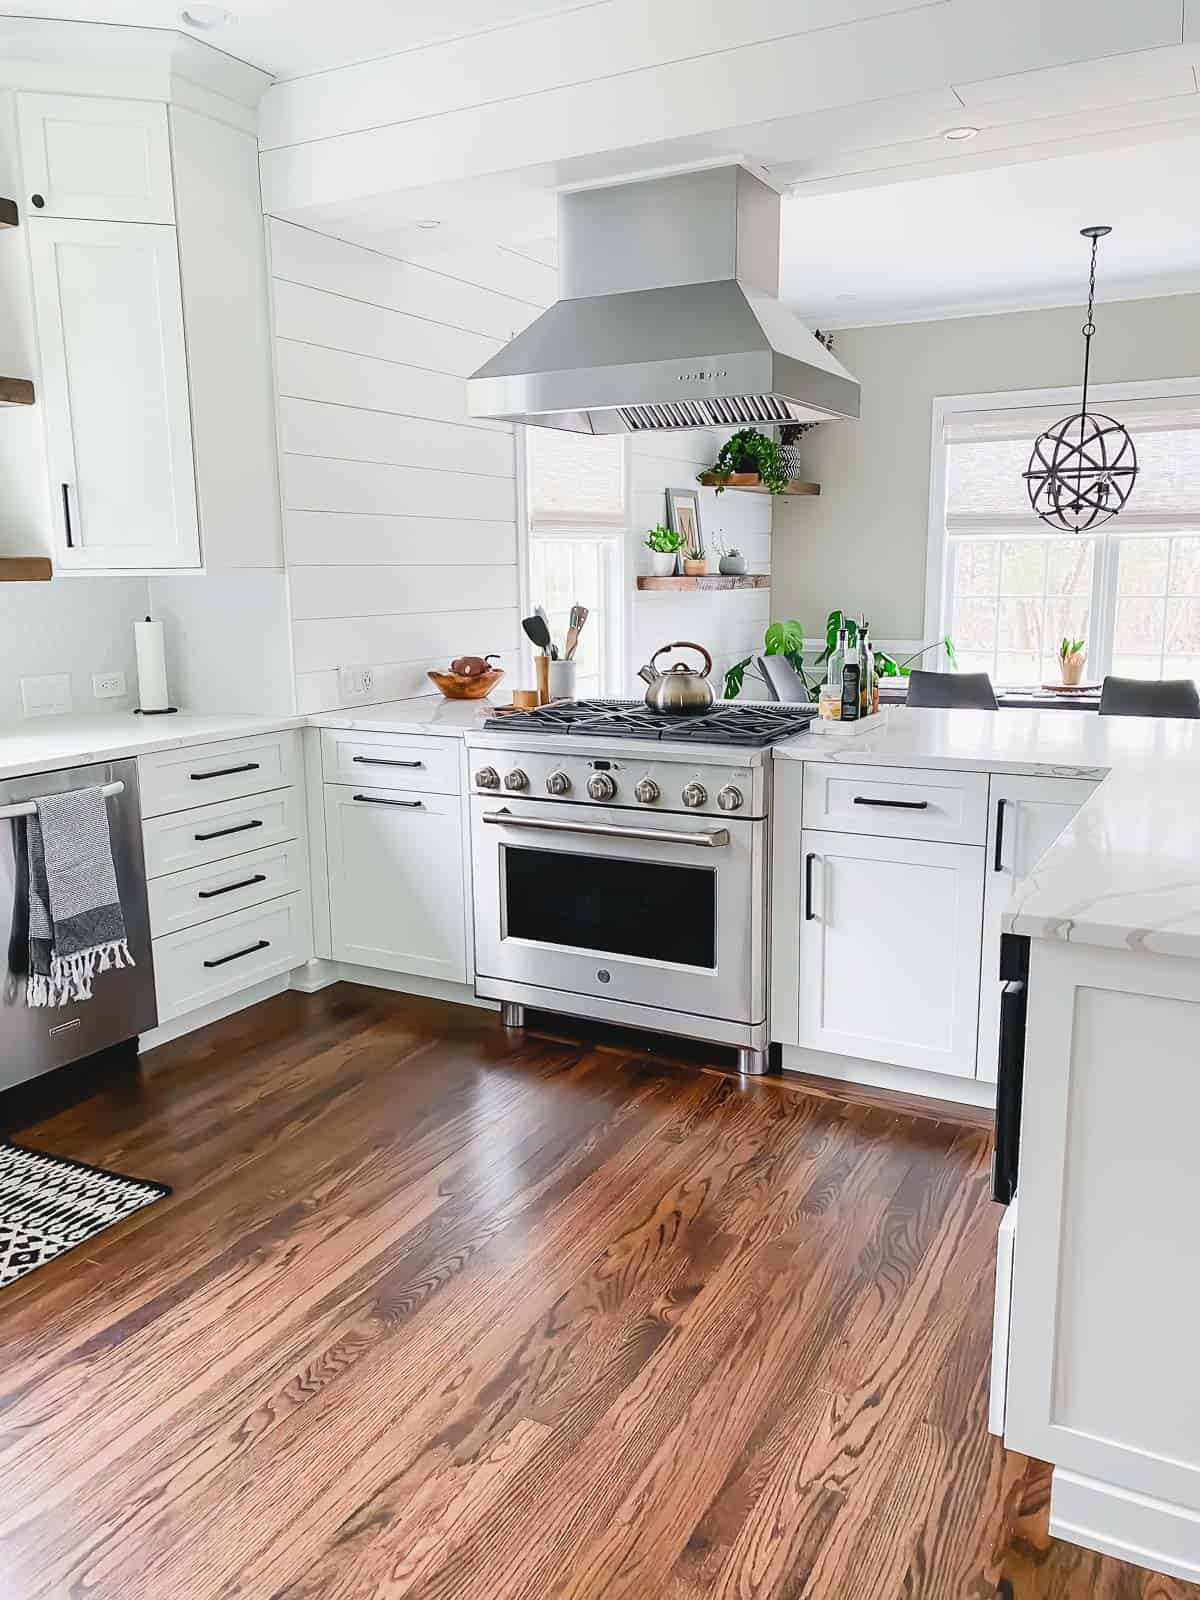
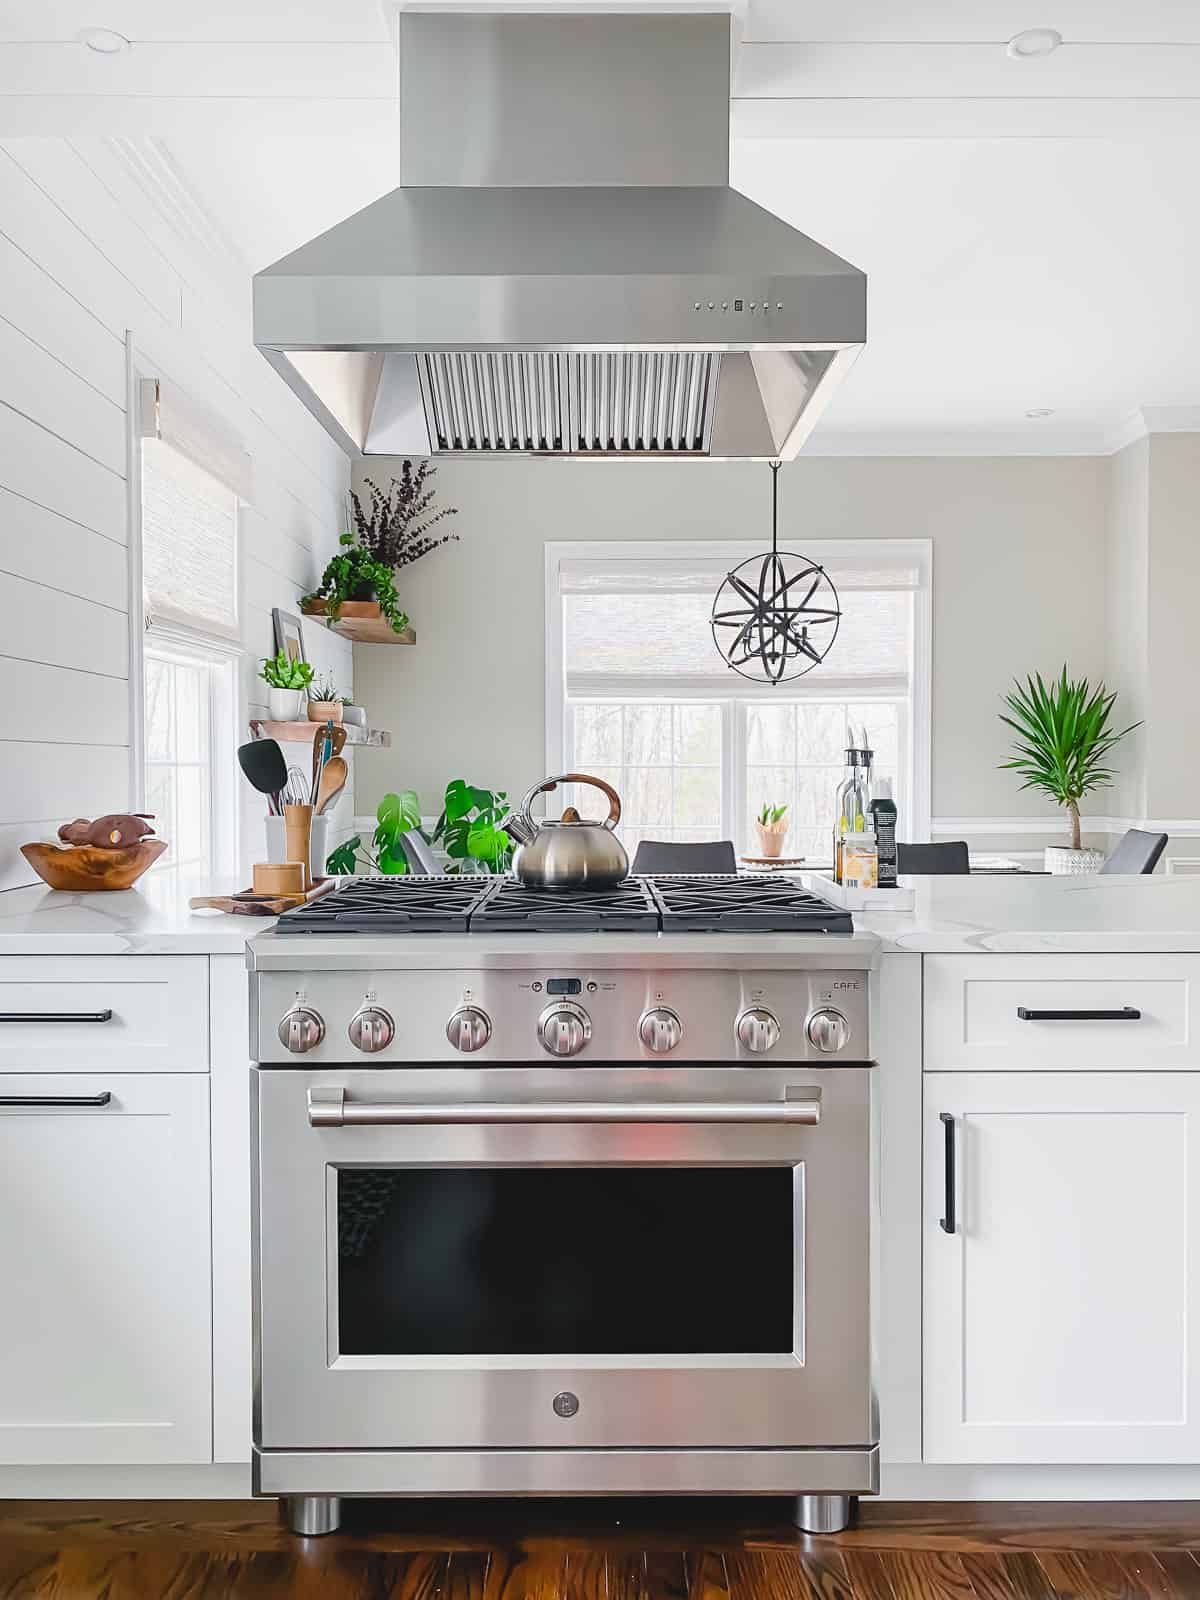
PRIORITY #2: UPGRADE STOVE & VENT HOOD
I’ve never had a gas stove in any place I’ve ever lived.
That’s sort of crazy isn’t it?
Cooking for a living, I knew I wanted to upgrade from a traditional 30″ range to a larger one and have the luxury of gas on the stove-top. There’s just nothing like the heat control you have with gas.
Getting this GE Cafe 36″ dual fuel range was something I’ve dreamed of for years.
I’ve also never had a vent hood in any of the places I’ve lived. That space has always held a microwave. Being able to suck out the smells and fumes of cooking is such a luxury now!
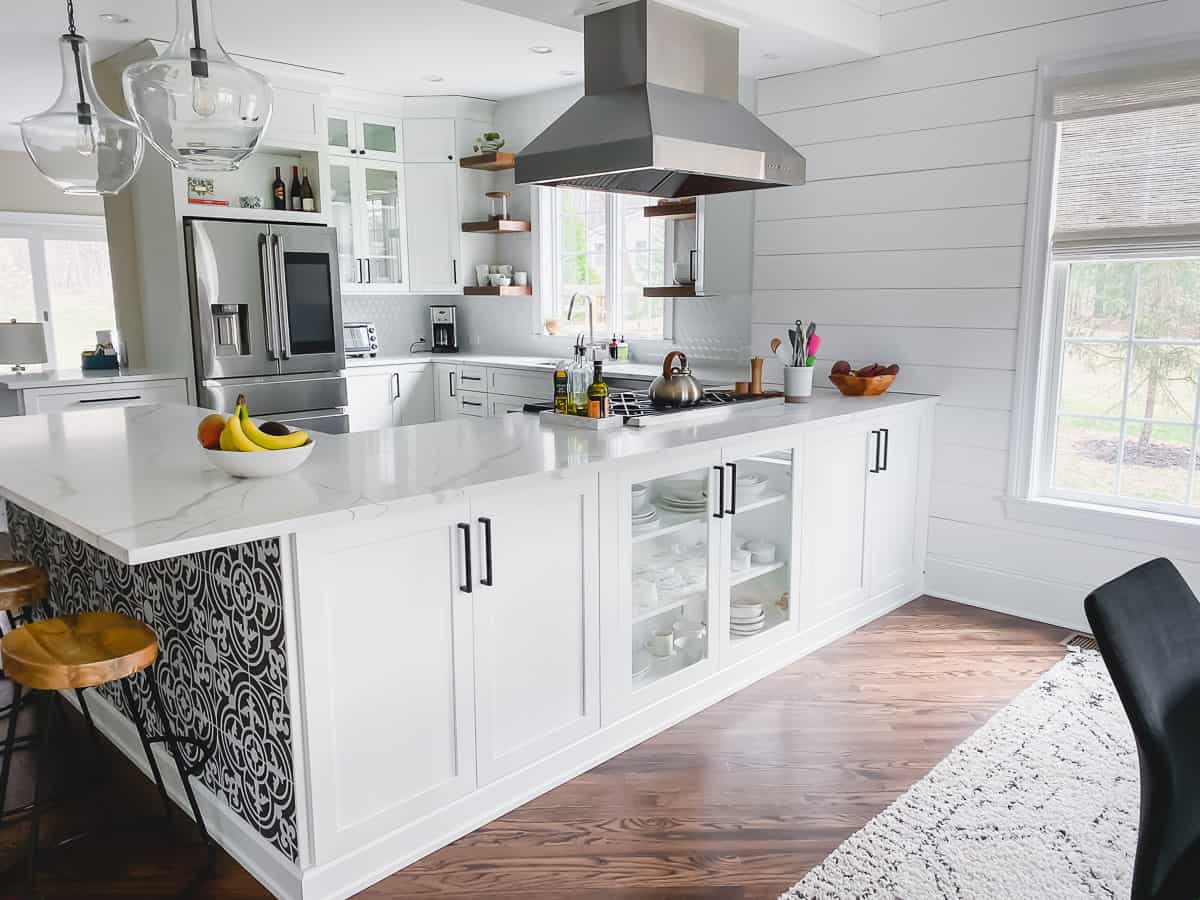
I went with this ZLINE island hood vent from Overstock and have been quite pleased with it. It has 4 speeds and tops out at 700 CFM which is definitely enough for heavy duty cooking. It also has controls on both sides of the hood which is kind of cool since it’s an island application instead of against a wall.
I found this stove on clearance at a scratch and dent place in Connecticut (it was just a year older model not actually scratched or dented!) and we hauled it home on Ulysses’ landscape trailer. I’ve never been so nervous for 50 minutes straight as I looked out the rear view mirror praying nothing flew up and hit it on the road!
Dual fuel ranges are not cheap but I swear the investment is worth it. Cooking with gas on the stove-top is life changing but being able to keep the oven electric for consistency when baking and roasting is just such a nice feature.
PRIORITY #3: WHITE CABINETS
White cabinets might’ve actually been tied with priority #1 and taking down the wall. I knew I wanted white to brighten the space up from the minute this remodel became a thought in my head.
If the layout was more conducive to an island in our space (I tried very hard to make that work but it just wouldn’t with our existing floor plan), I would’ve loved to have two-toned cabinetry but since that wasn’t a possibility, I went with all white.
I learned more than I ever thought possible about cabinets in this process working with a local contractor, A&E Cabinets in Beacon, NY.
One thing I can’t recommend enough if you’re dealing with a major remodel and complete re-working of your space is finding a local cabinet contractor that also does design. Albert’s knowledge at A&E Cabinets was a godsend in this process.
CABINET DETAILS
After finding out that my cabinets in the old kitchen was what they call a “frameless” full overlay cabinet, I knew I wanted to repeat that in the new kitchen.
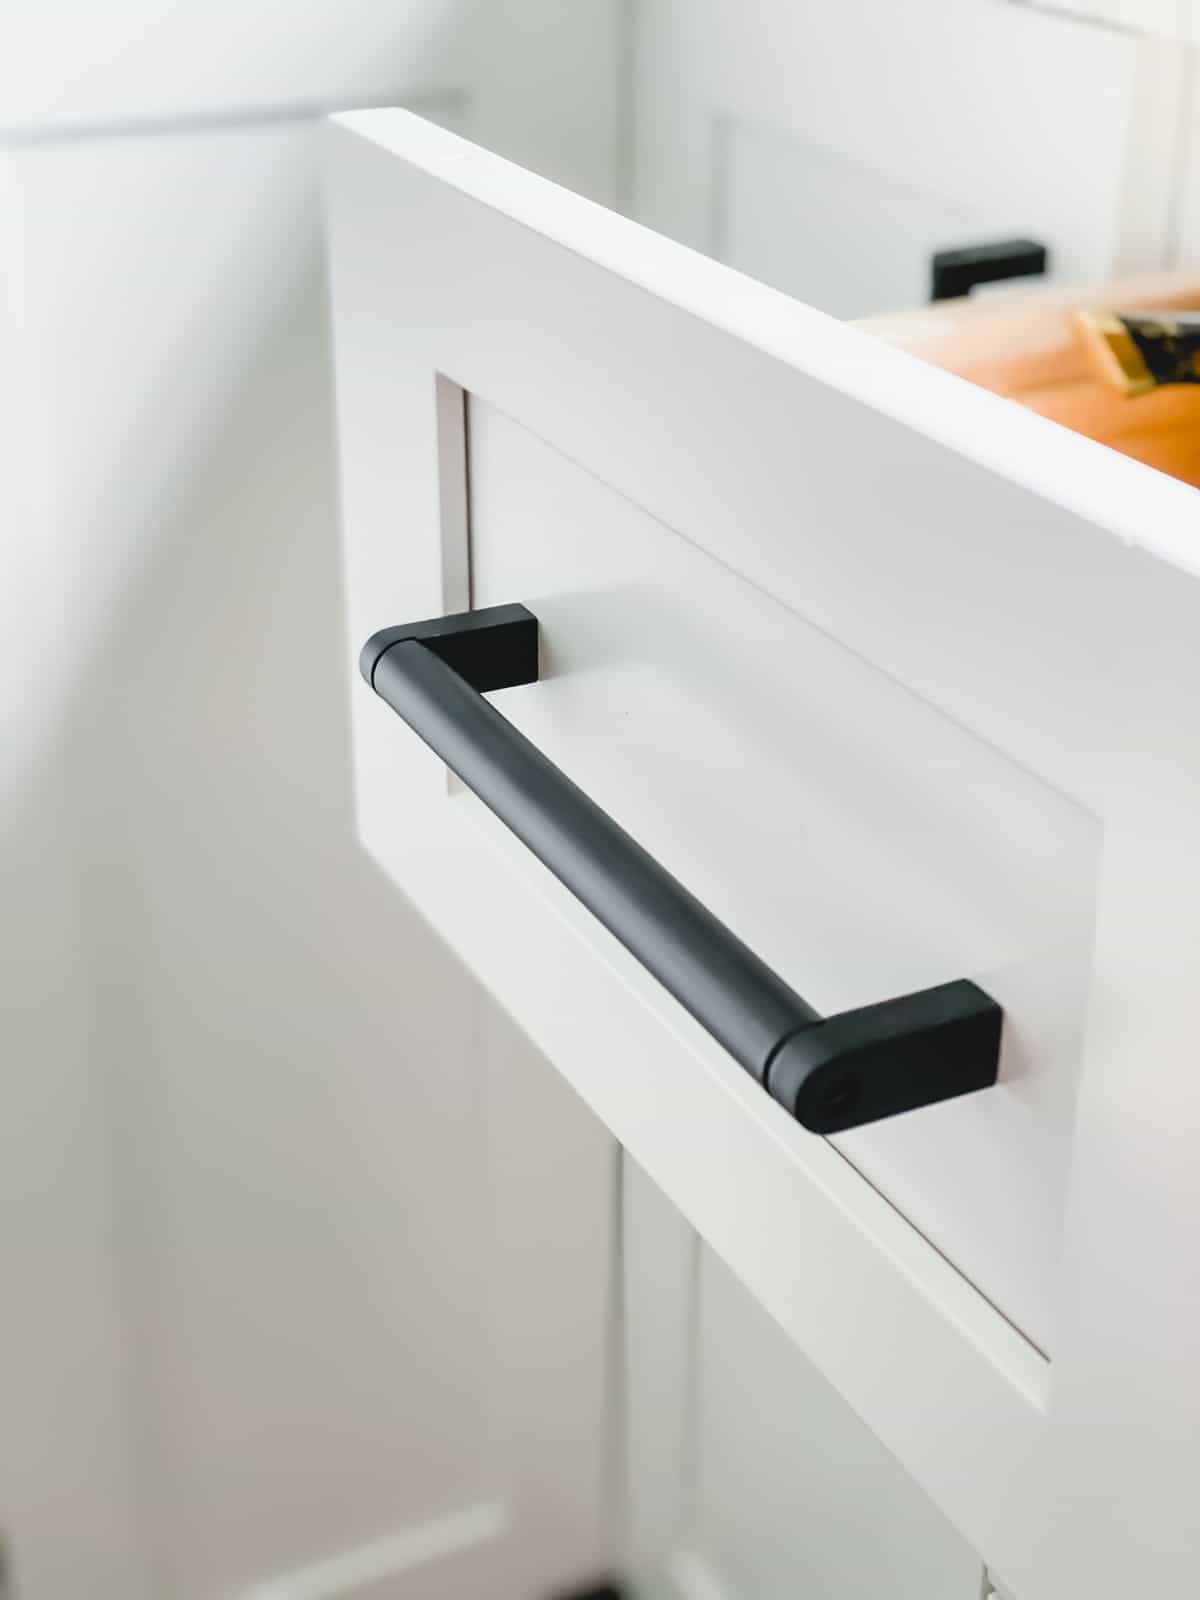
It’s still hard for me to articulate the difference between a framed and frameless full overlay cabinet design but see how my drawers abut each other rather than have space between them on the cabinet frame that a lot of cabinetry does? That’s sort of one way to tell the difference.
In my opinion, framed cabinetry wastes a lot of space and I both loved and had gotten used to my previous frameless cabinets so we went with that decision in the redesign.
I ended up doing frameless full overlay cabinets from Eclipse cabinetry which is a subset of Shiloh Cabinetry. These are maple wood painted in their “Polar White” finish. The door style is called Hanover.
I envisioned a cleaner almost shaker like cabinet that was simple enough to hopefully be timeless but also updated enough to feel “new”. I think this selection achieved that.
CABINET HARDWARE INFO
I tried my best to keep cabinet hardware an easy and cheap choice. That didn’t work out.
Nothing at the box stores went with my vision so I ended up on Top Knobs website ordering a bunch of samples. This went from a $275 budget line item to almost $500 total but the quality difference is completely worth it.
I can’t say enough great things about this hardware. It’s substantial in your hand. No cheap, lightweight pulls and knobs, this stuff is heavy duty and sturdy and they have so many designs to choose from.
Top Knobs has a great sample program too and I’m so glad I did that because I actually ended up choosing a design I thought I wasn’t going to like as much as another once I saw it against the cabinets.
Cabinet and drawer pulls – Top Knobs Pennington Bar Pull in flat black
Cabinet knobs – Top Knobs Essex Knob in flat black
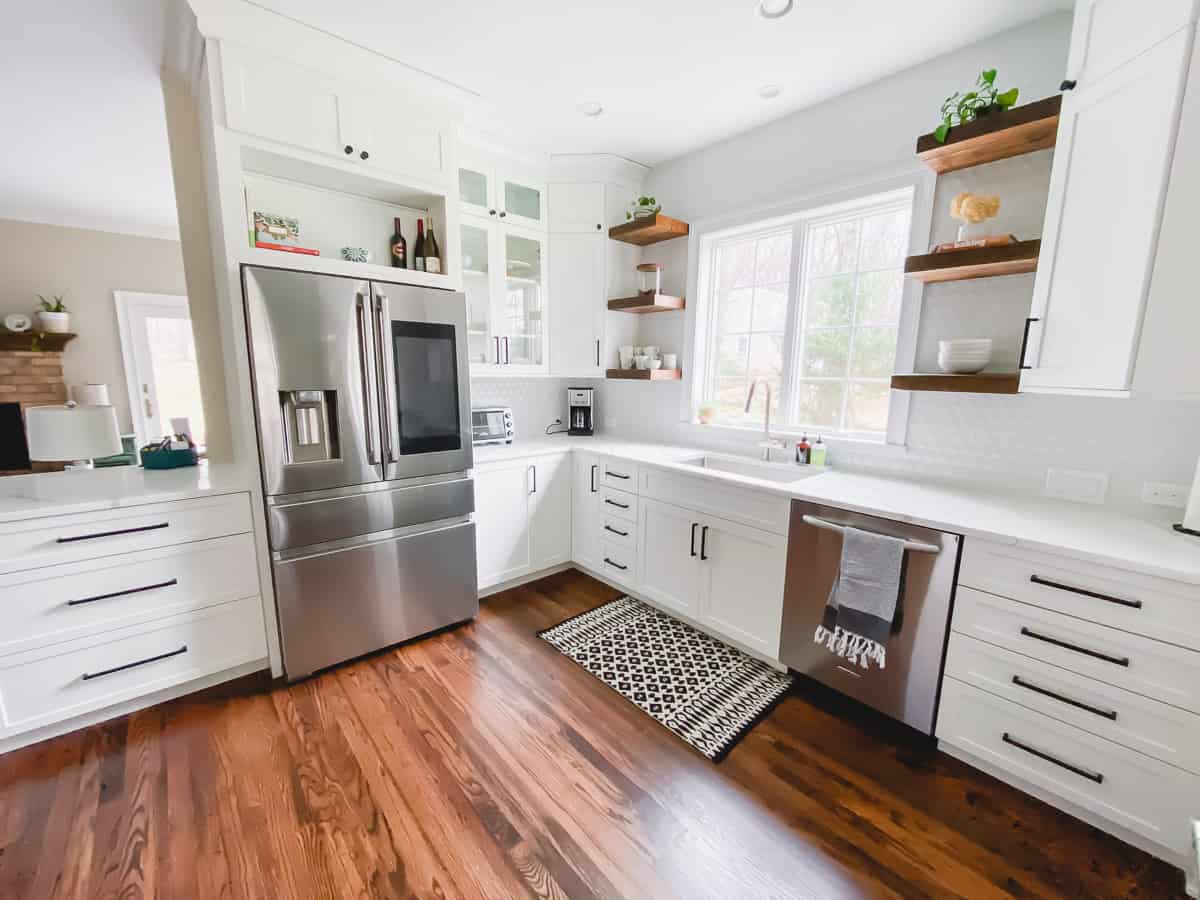
PRIORITY #4: FEWER UPPER CABINETS
Taking down the wall already automatically reduced the number of upper cabinets we would have with this redesign (go back up and look at the before to see how much upper cabinetry was eliminated!) but I knew I still didn’t want to take up all the wall space we did have left with uppers.
Gaining some cabinets on the back side of the counter top where the stove is, I knew storage space wouldn’t be an issue.
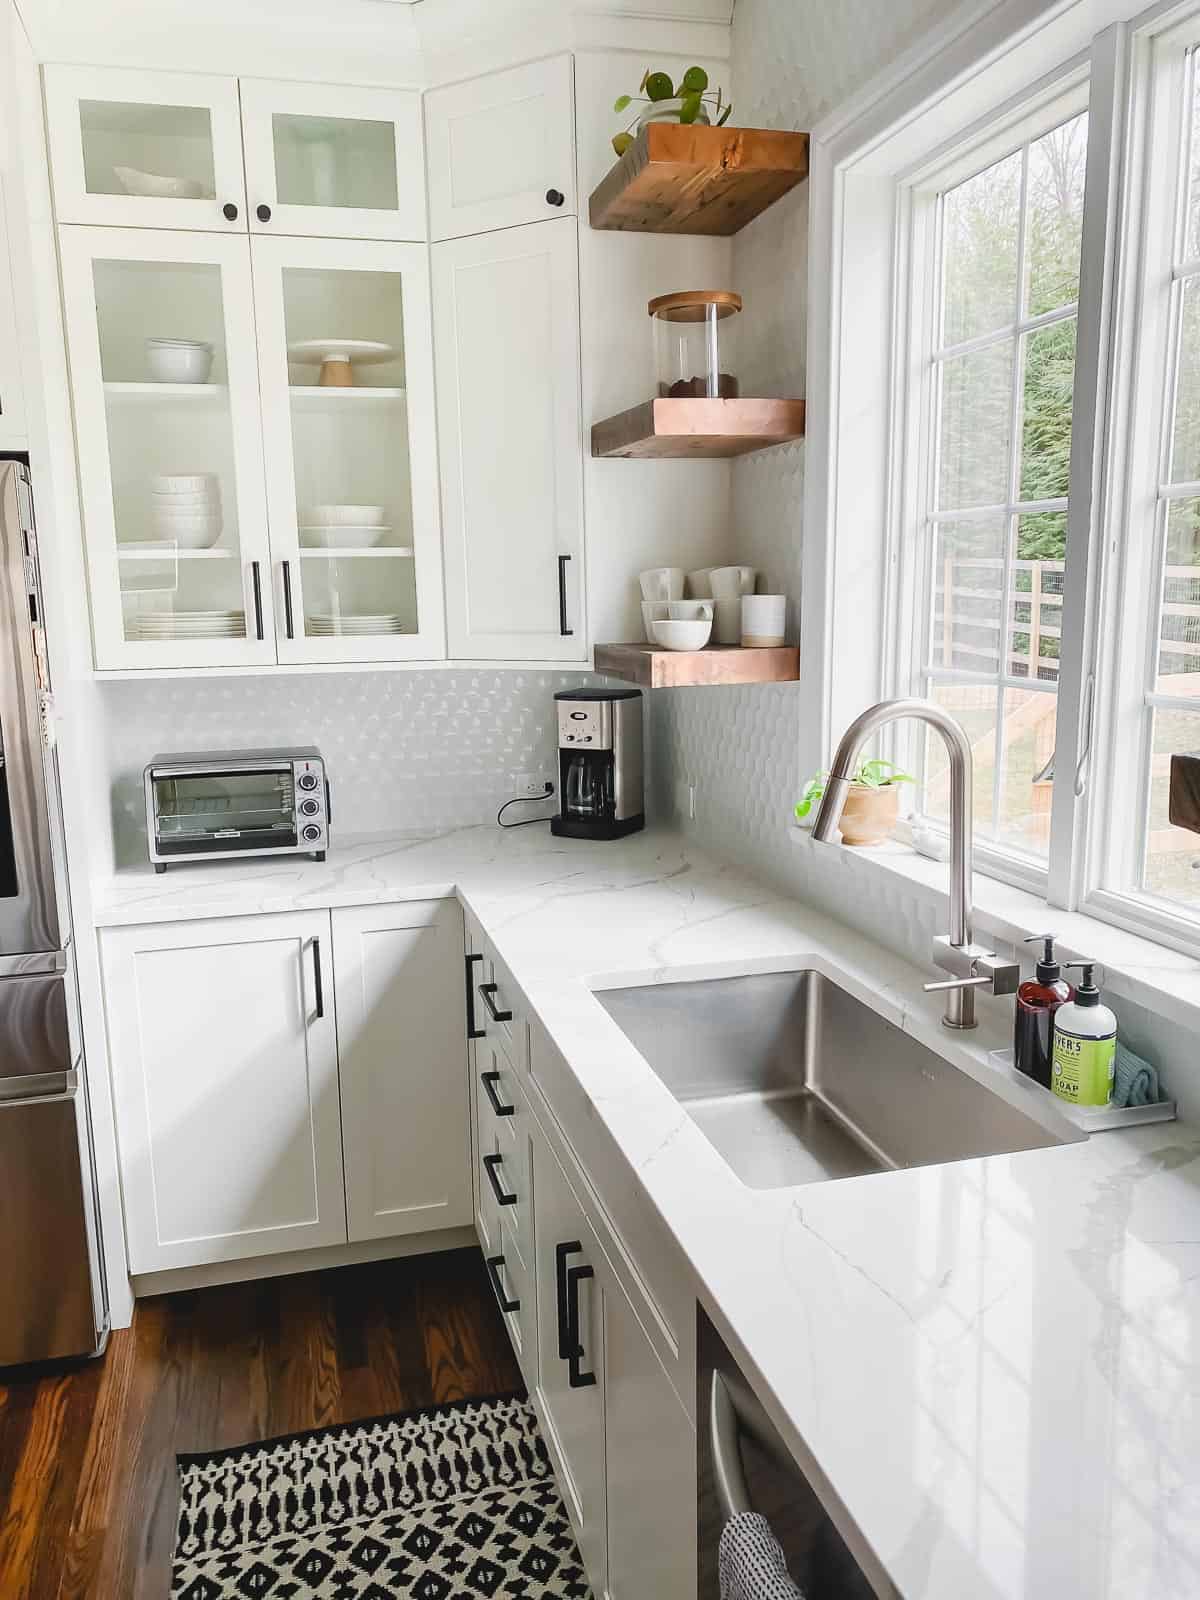
Since we decided to keep the existing window in the kitchen rather than make it bigger for even more light, I knew I didn’t want to close it off by having cabinetry run straight up to the window trim.
That’s when the idea for some wood shelving to bring some warmth into the space came into play.
I ended up finding a reclaimed wood place local to me – Authentic Antique Lumber who custom made these floating shelves to the space we had.
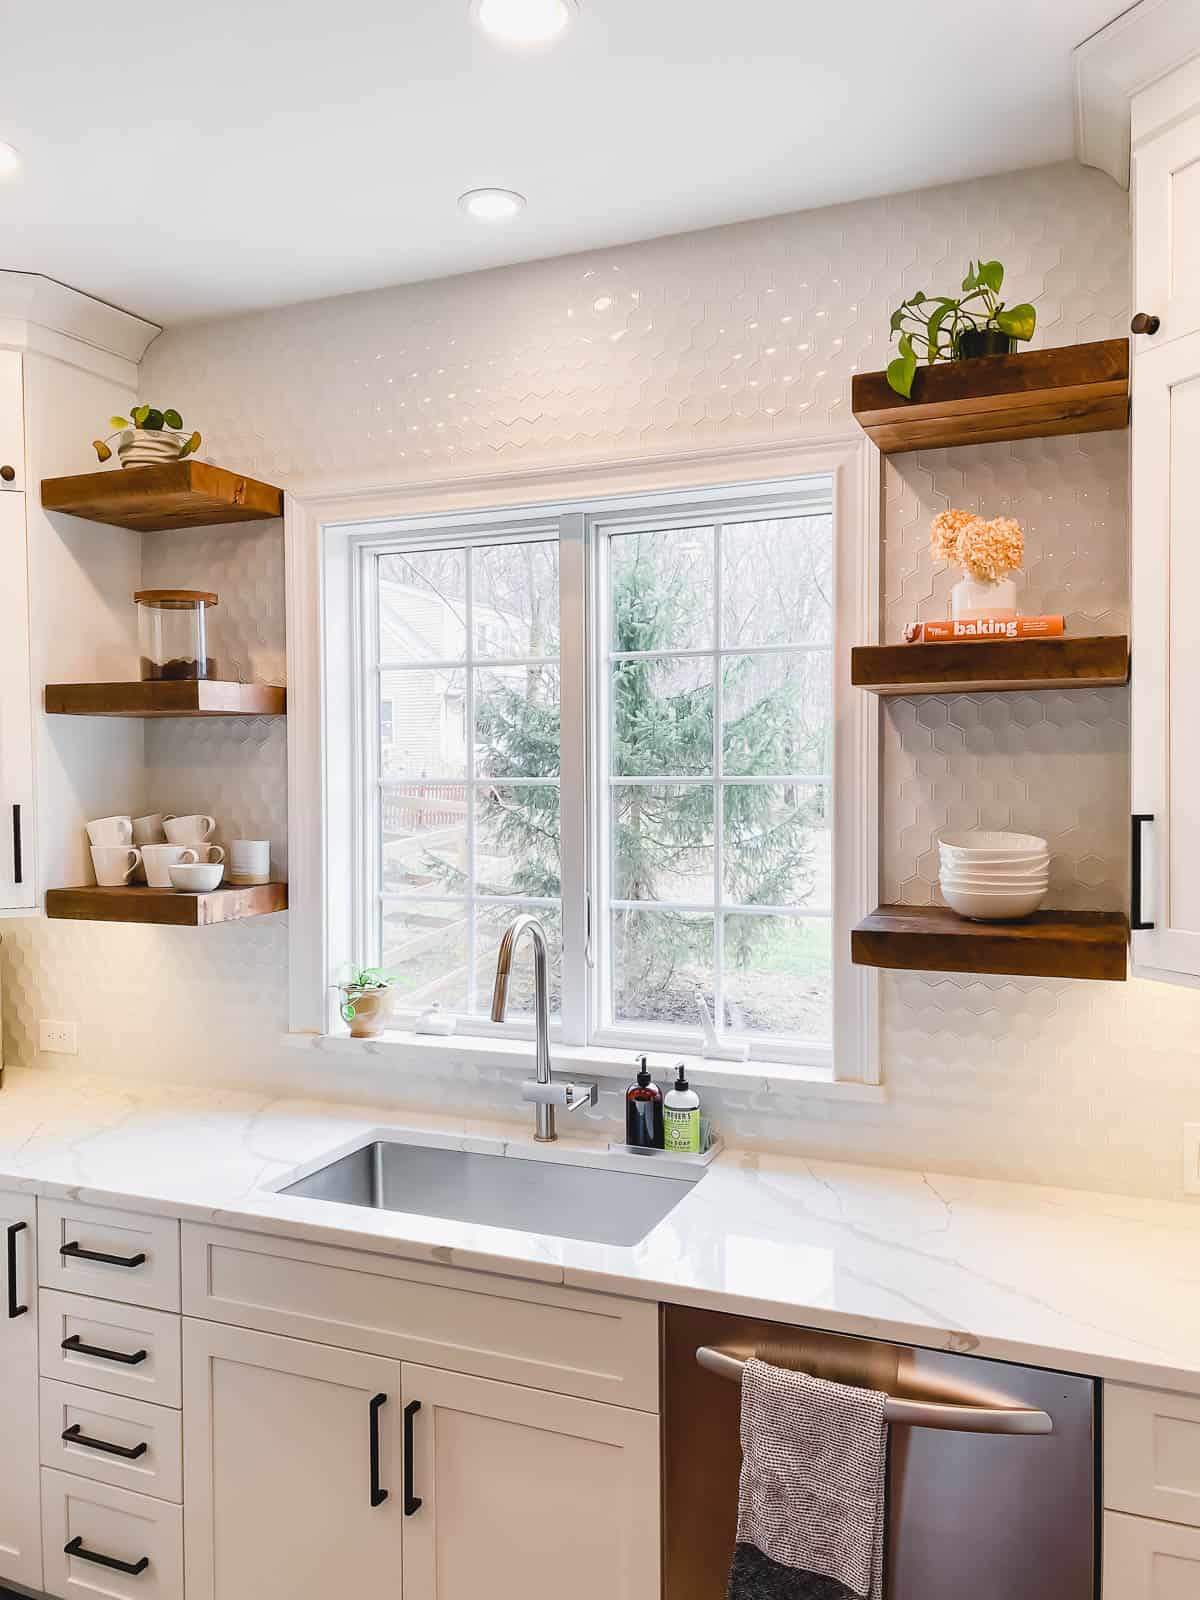
They’re one of my favorite details in the whole renovation. They also made some longer shelves I used in the dining room space you can see above.
Using floating shelving here also gave me the perfect way to showcase the backsplash.
WHITE CONCAVE HEXAGON TILE BACKSPLASH
This backsplash…oh, this backsplash.
A renovation this size was not easy. There were MANY decisions to be made that stressed me out.
But, the one that gave me the most sleepless nights was not one you’d imagine…THE BACKSPLASH.
I agonized over this decision.
From subway tile, to the more trendy glass tile to marble to herringbone vs. traditional patterns and everything in between, it took me ages to settle on this.
I wanted something fun but not too fun because I think if there’s one thing that can date a kitchen faster than anything else, it’s the backsplash tile!
I actually found this exact tile in someone else’s kitchen renovation on Instagram and will proudly admit I copied it exactly.
The hexagon shape alone is fun but these tiles are slightly concave and the light just bounces off of each one in such a fun way.
When people ask me my favorite part about the kitchen renovation, I often say the backsplash. Funny, huh?
Tile details – Heritage Tile glazed concave hexagon
OTHER FUN DETAILS TO THE KITCHEN REMODEL
ELKAY SINK & FAUCET
We had upgraded the sink in our previous kitchen with a large single basin Elkay sink back in 2013 and it was my favorite thing about that old kitchen.
It was 10″ deep and featured their perfect drain (the sink goes right into the drain without that edging/trim around the drain that collects grossness) and I almost kept it to reuse in the remodel I loved it so much.
But, after Elkay generously provided us the sink and faucet, we ended up upgrading both.
I was adamant about keeping the perfect drain feature so as you can see below, that’s still there in the new sink.
The main differences are:
- the depth (this one is 9″ not 10″ but still plenty deep)
- the finish (the new sink is more matte in color than the traditional shiny stainless steel)
- the corners (the new sink has more squared off corners that goes better with the new kitchen design)
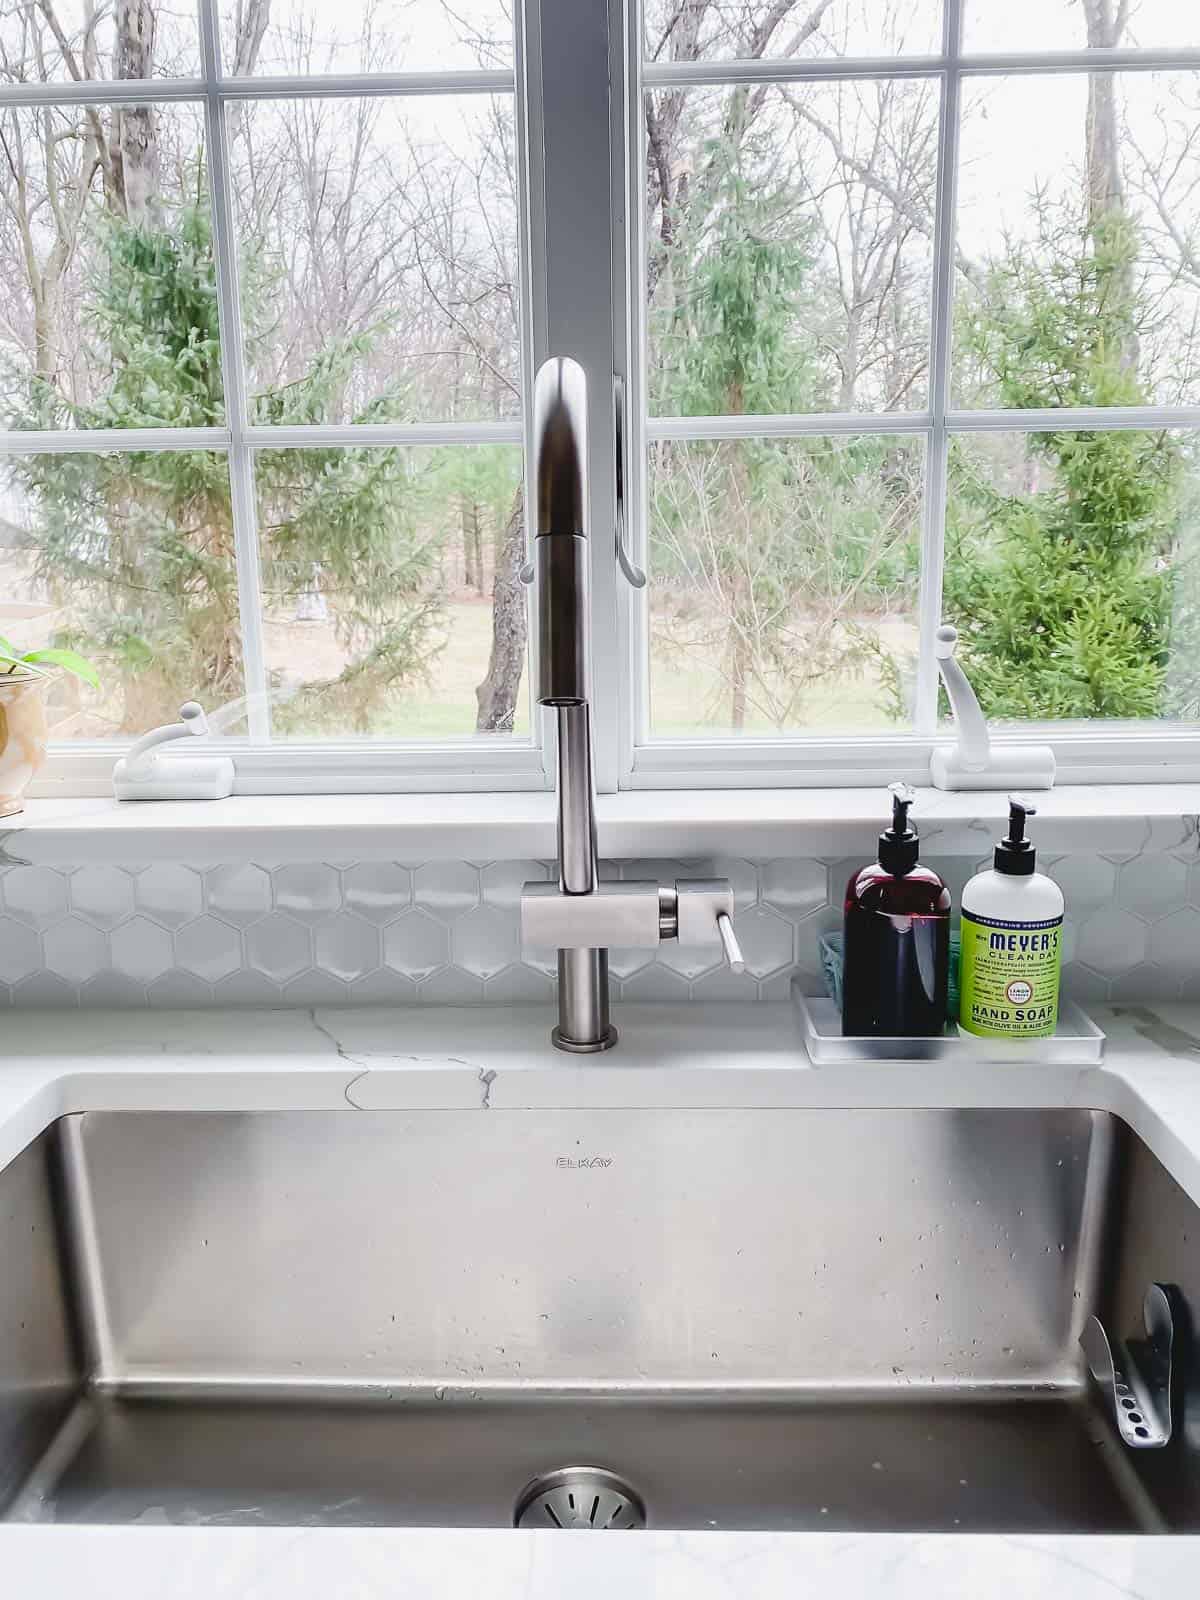
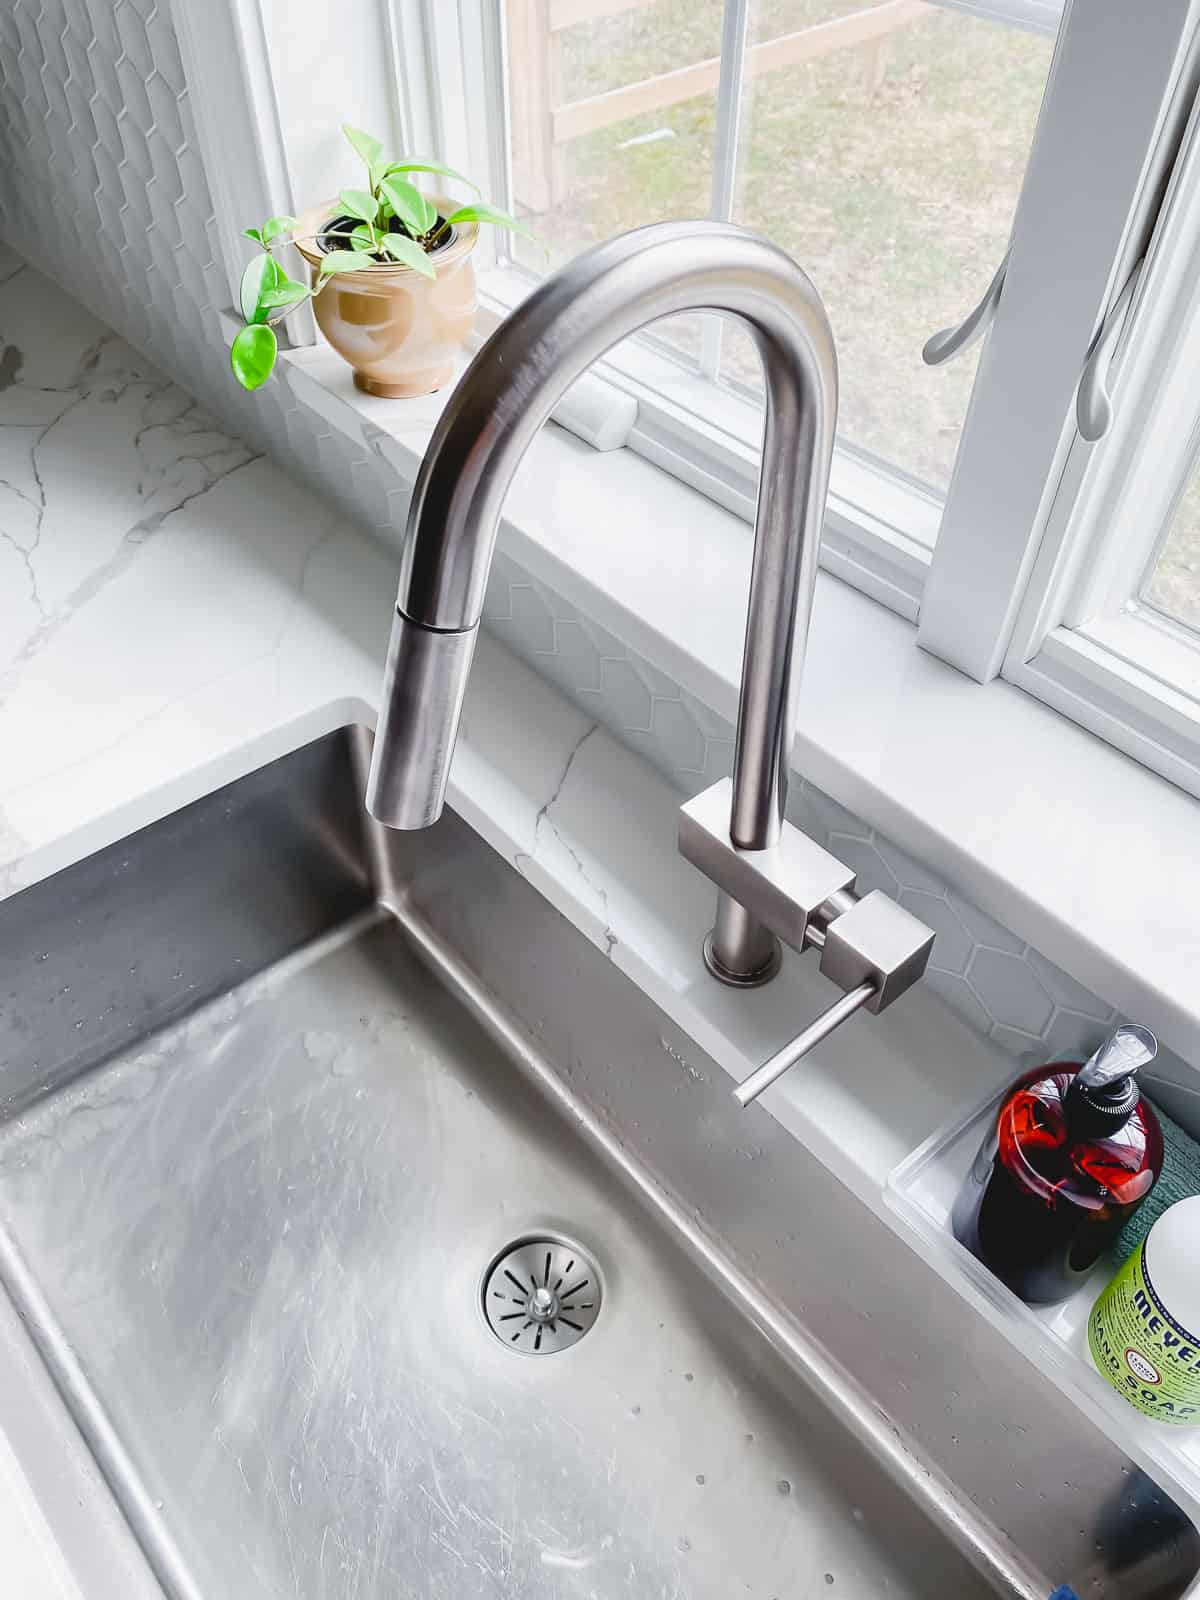
Elkay Faucet – Elkay Avado Single Hole Kitchen Faucet with Pull-down Spray and Forward Only Lever Handle
Elkay Sink – Lustertone Iconix ELUHH3017TPD Single Bowl Undermount Stainless Steel Sink with Perfect Drain
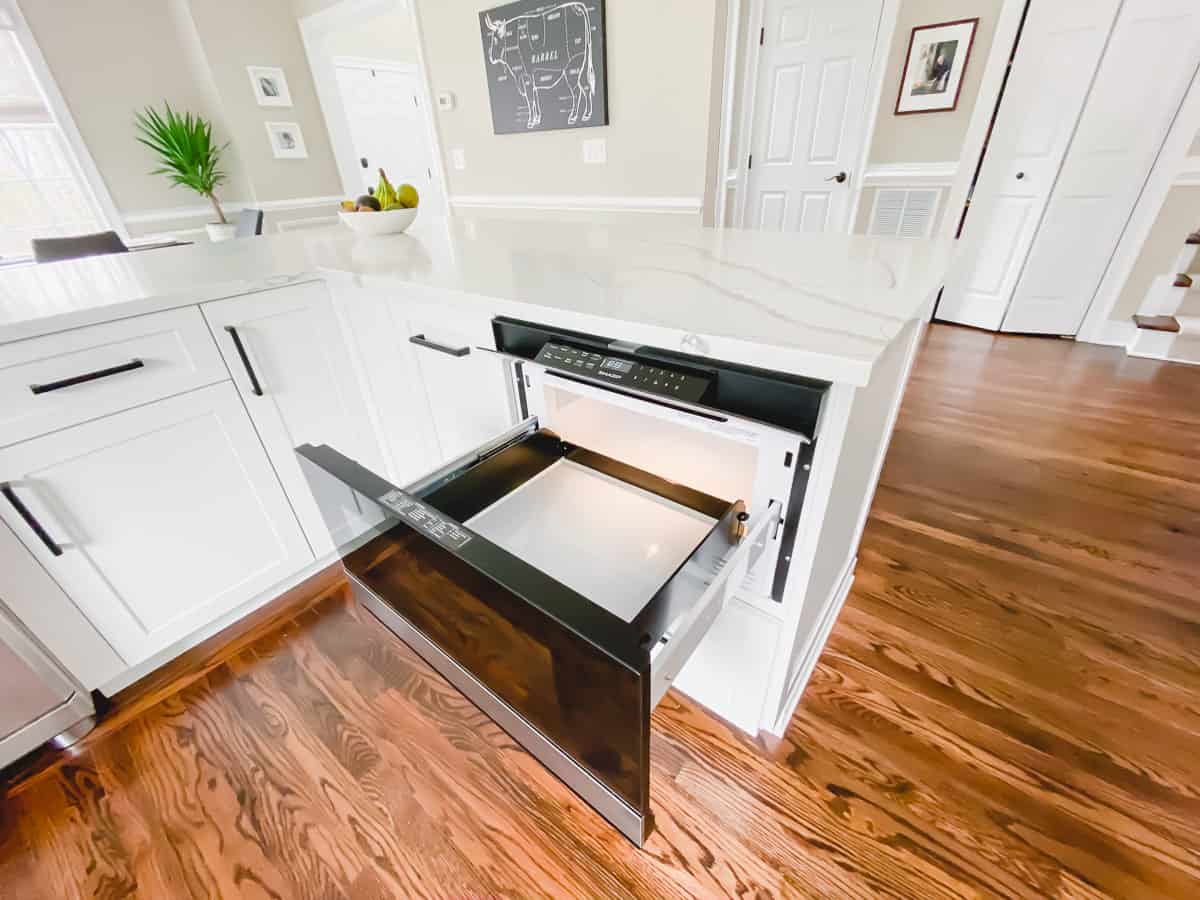
SHARP DRAWER MICROWAVE
Finding a home for the microwave become another weird little stressor/decision in the remodel since the stove is not on a wall any more and now has a vent hood above it.
I debated between building out a nook to put a regular counter-top microwave in and an actual drawer model microwave like we ended up with.
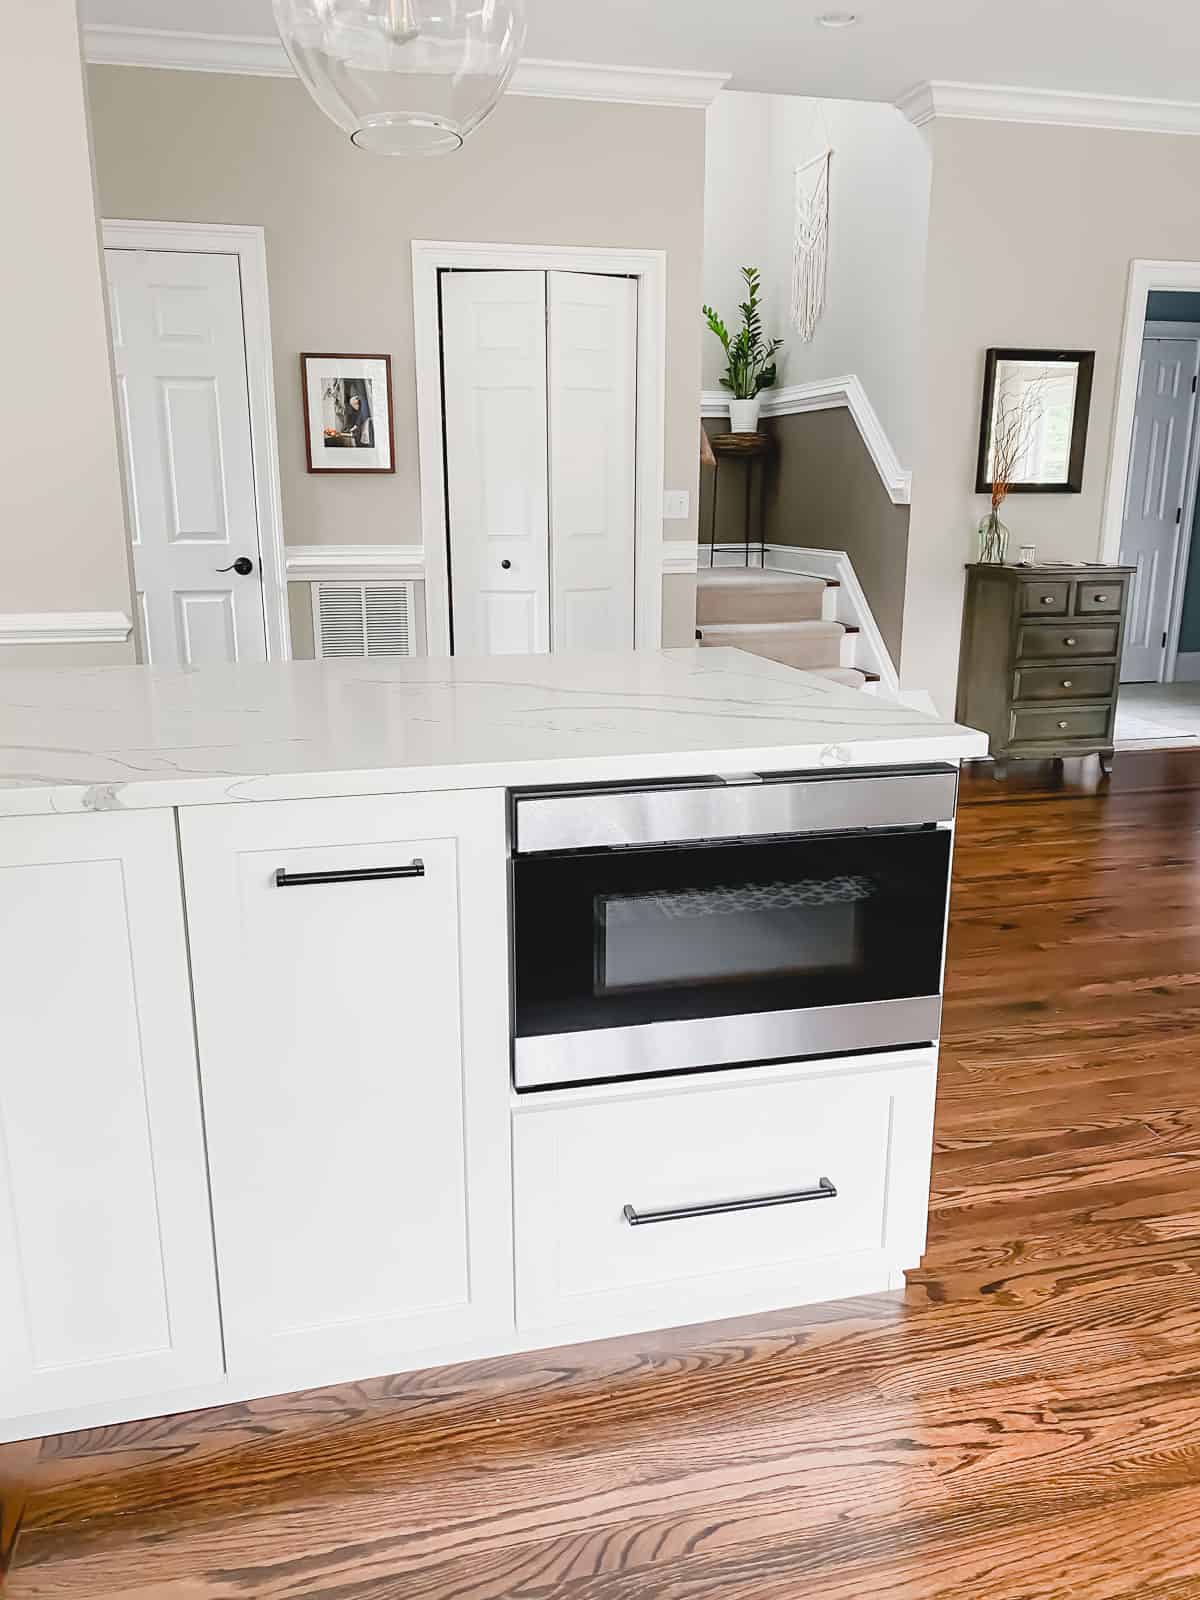
These new drawer microwaves are not cheap by any means and it was a hard pill to swallow for an appliance that honestly, doesn’t seem to warrant it.
But, I think it really blends into the design much better than a nook with a cheap counter-top microwave would.
I purchased this model using a gift card Home Depot kindly gave me towards part of the purchase.
MOSAIC TILE BACKSPLASH
The idea for the fun black and white mosaic tile backsplash along the back of the cabinets where the stools are came to me right at the end of the planning process.
I think my contractor was ready to throw in the towel at this point in the game when I changed things one last time before the remodel actually began.
I just thought a fun tile backsplash instead of an 8 foot+ swath of white cabinets would be much more fun to look at.
It also has a durability aspect to it as well. With tile there, I don’t need to worry about scuffs and scratches like I would if it was the white wood backing of the cabinets.
We actually used this same tile in a gray and white pattern on the floor in the powder room which is in the hallway almost directly behind the stools in this picture.
The floor in that bathroom needed updating anyway and it was a fun, easy and relatively cheap way to integrate the spaces.
Tile details – Decocer Encaustique Paris
WHITE KITCHEN REMODEL – OTHER SOURCES
STOOLS – Wooden Saddle Seat Brown Barstool with Tubular Metal Base
PENDANTS – Goffredo 1 – Light Single Schoolhouse Pendant
COUNTER TOPS – MSI Calacatta Laza Quartz
The refrigerator is a Samsung Family Hub counter-depth model and dishwasher is a KitchenAid – both were already owned and reused from old kitchen.
REFINISHING HARDWOOD FLOORS
We also had to completely refinish the wood floors on the entire bottom floor of the house. We settled on Coffee Brown by DuraSeal.
And while they look great now, this was the absolute most nightmarish part of the entire renovation.
We actually had to go through the whole process twice because the sanding was not done properly the first time around.
A word to the wise: do not refinish floors while living in a house. The dust is horrific.
I will never again in my life undertake that job and it’s the reason our wood floors upstairs will never match the downstairs now because you’ll never be able to convince me to go through that ordeal again.
We did the stairs as well as the bottom floor so you’d never be able to see the difference in finish if you were downstairs. We also put a carpeted runner on the stairs so even when you get to the top, the difference in stain color isn’t as jarring as it’d be if the whole stair was exposed.
Ugh, I cringe thinking about those 3 weeks dedicated to the floors. I think 85% of the grey hair on my head today can be attributed to that process. It.Was.Horrible.
WHITE KITCHEN REMODEL: COST
If you’re anything like me, you read remodel posts like this and always wonder about the cost. I have no problem sharing that info and I know many are curious.
When we first started planning this, I had hoped to keep things in the $50-60k range.
Of course, staying on budget never happens.
Things like cabinet quality, the load bearing wall removal (mostly this) and additional electrical work all drove up the cost from my hopeful budget range.
I kept a pretty detailed spreadsheet on the cost of every single item of the remodel in the beginning but I’ll admit to sort of just letting it go in the middle of the renovation as random things popped up here and there.
At some point, it is what it is and you just gotta roll with it.
So while this isn’t exact down to the penny, total cost including labor of this white kitchen remodel was somewhere in the $75k range.
We paid for over 95% of the renovation ourselves with two very small sponsors contributing towards the microwave, sink and faucet as mentioned.
It’s honestly not something we plan we’ll get our money completely back on but the outcome is something I enjoy and love every single day I spend in my house so it’s well worth it in my opinion!
Let me know in the comments if you have any questions about the remodel I didn’t address in the post, I’m happy to let you know what we used and if I’d recommend!

Gina Matsoukas is an AP syndicated writer. She is the founder, photographer and recipe developer of Running to the Kitchen — a food website focused on providing healthy, wholesome recipes using fresh and seasonal ingredients. Her work has been featured in numerous media outlets both digital and print, including MSN, Huffington post, Buzzfeed, Women’s Health and Food Network.


I just stumbled on your reno post, Gina, and it is absolutely gorgeous! I am in the middle of a kitchen reno myself and discovered I need to paint the kitchen walls a different color. Can you tell me the gorgeous color of your dining room paint? Thank you so much!
Hi Tammy- thanks so much. The paint in the entire house is Benjamin Moore Revere Pewter. It looks very different in each room depending on the lighting which is one reason I like it, it sort of adapts to wherever it is. Good luck with your reno!
Hello! Beautiful renovation! I am in the process of a similar remodel. Brazilian Cherry floors and cabinets, white subway tile backsplash, kitchen island is also cherry. North facing kitchen. I want to do white on the cabinets. Not stark, yet not gray, do not want any creaminess. Can you recommend a different color that you’ve used………heading towards SW Pure White. I love BM White Dove, but might be too creamy with the tile. Then, there’s the island. Can you recommend…….keep it cherry, paint it white, I feel that accenting it in a dark color is just too heavy. Thank you!!
Georgeous kitchen! Would you mind sharing the dimensions please?
We are planning the renovation of our kitchen, and looking at the Shiloh Polar white. We have a south west facing kitchen and the door sample reads a bit yellow in our space? Yours look white in the photos (beautiful). Do you see any yellow at any time of day?
Hi Sue – The cabinets have never come off yellow in the house. Even the ones that face the dining room which is a southern exposure vs the kitchen which are northern never look yellow even in the afternoon. I did think the sample looked a bit yellow too before install but that was me looking at it in the showroom under their lighting. Hope that helps, good luck with your reno!
Your Kitchen turned out beautiful! Thanks for sharing the pics and the process step by step. Would it be possible to know what the cabinet portion of the Reno cost?
Thanks, Kim! The cabinets were right around $20k of the total budget.
Honestly, I would have liked your old kitchen – BUT after the viewing the new WOW beautiful kitchen/dining – the old is just that -old.
Haha, I agree. The old wasn’t horrible for sure but this is SO much better :) Thanks for the kind words.