Learn how to make a photography board in these easy steps.
You may have noticed my recent background board considering it’s been in the last three posts. I’m only slightly obsessed with it. Last week, I alluded to manipulating my husband with mac ‘n cheese to help me out with something. These were that something.
I’ve been wanting more backgrounds forever. I’ve seen and heard about many others make them, I knew it was something I could tackle (with a little help), it was just a matter of actually doing it. Long weekend with a husband off for more than 1 day finally meant it was going to happen.
I won’t pretend to have created this method. I owe pretty much all of the success of these to Lindsay and her awesome post about it but I’m going to detail the process I went through anyway since there were a few tweaks.
First, the materials:
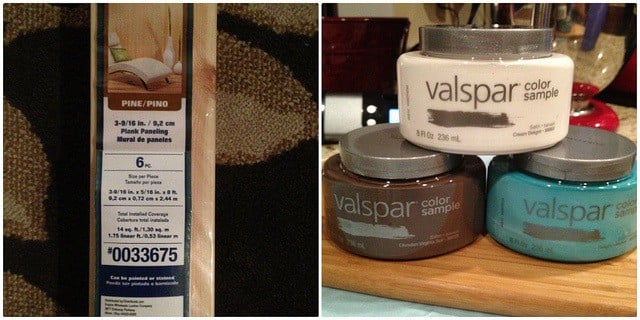
There was also some wood glue purchased that went undocumented. I think you know what that looks like though. We went to Lowes and found tongue & groove plank paneling somewhere around the lumber section among a bunch of bead board. I didn’t want traditional bead board because the lines are too close together on it and seem distracting. Planks were perfect. They are about 3 1/2 inches wide and 5/16 inches thick. But, they were 8 feet long. We simply asked the guy in lumber if he’d use the fancy cutting machine to cut it up (while still in the package) since I definitely didn’t need 8 foot long photo boards! I decided on two 2 1/2 foot sections and then one remaining section of 3 feet. The planks cost $15.
For the paint, I just grabbed a few from the sample section of the paint department. The brown is for the undercoat to help make the boards look distressed and the white and turquoise were the two colors I wanted. Pick whatever color you want for your boards just make sure to grab the brown for the base as well. Each paint sample was $2.97.
Making the board:
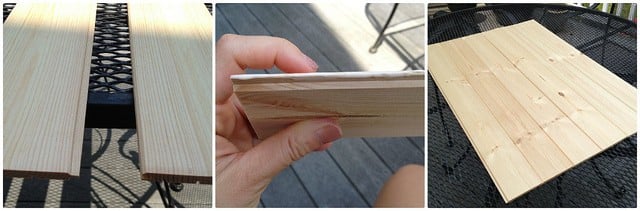
This part couldn’t be simpler since the planks were tongue and groove. In theory, you don’t even need glue, but I wanted it for that added support since this wasn’t being nailed to a wall and would be picked up and moved around quite a bit during photography. All I did was spread a thin layer of wood glue on the “tongue” part of each plank before inserting it into the “groove” of the other plank. Make sure you wipe off any excess glue that comes to the surface when inserting them because it will not allow the paint to adhere well in that spot otherwise. I just let it dry for a few hours outside in the sun and it set perfectly.
Base coat:
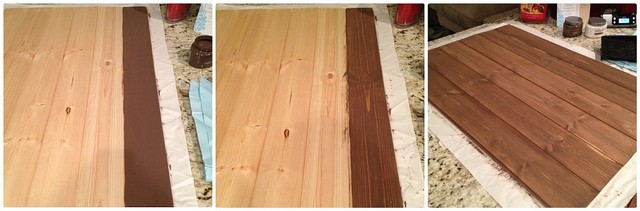
The planks were great in every aspect except they looked brand spankin’ new (which they were, duh) so the brown paint goes on first to help get that “distressed” look. I mixed the brown paint with water in about a 50/50 ratio like Lindsay suggested and painted it on one board at a time. With a bunch of paper towels nearby, I just wiped off the brown plank by plank. You can see the difference from the first picture which is pre-wiping and the second which is post-wiping. It goes from looking painted to looking stained. Perfect. I did this for all the planks and then let it dry. Since it’s such a thin layer, it dries very quickly (15-20 minutes).
Top coat in turquoise:
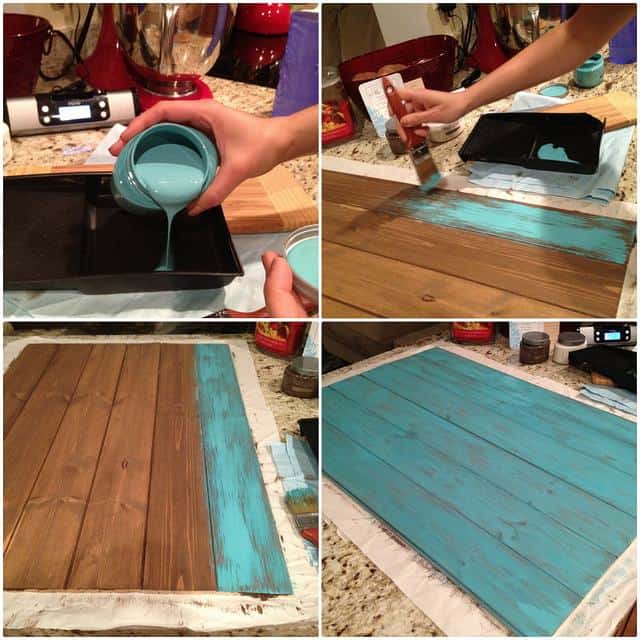
Now the fun part, color! This part also scared the heck out of me because you want a distressed look and it takes careful effort to make it look that way. This time, I poured the paint (no diluting with water) into the tray, took my brush and quickly, without too much paint on the brush, spread the paint in uneven brush strokes up and down each panel. Like Lindsay says in her post, you can always add more paint but you can’t take it off so start with less and then decide if you want more.
Top coat in white:
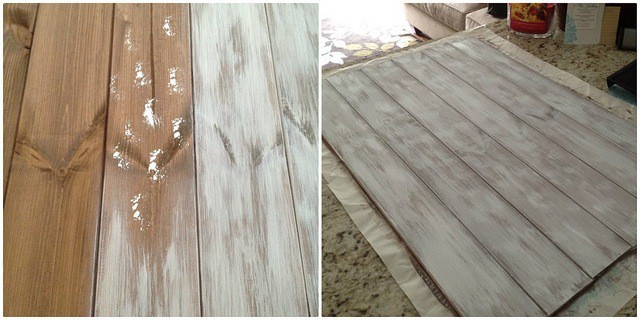
I did the same thing with the white board. Here you can see on the left my method a little more clearly. I put just a touch of paint on the tip of the brush, dotted it on the plank and then brushed it together. This helps the first area that your brush hits not to be completely coated.
And that’s it! It was way easier than I thought it would be and truth be told, I didn’t really need Ulysses’ help too much so he’s lucky he got mac ‘n cheese out of the whole ordeal. Once we figured out the right planks in Lowes I was able to do this by myself.
Here’s some behind the scenes of where I shoot:
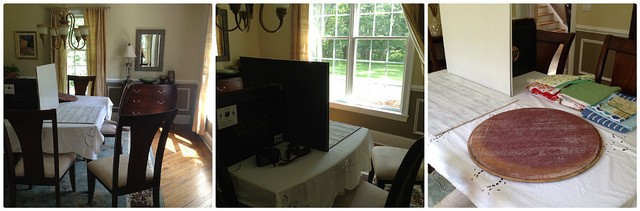
People ask me all the time if I have a light box, where I shoot, how I shoot… Here it is folks. My dining room table. A white tablecloth, 2 white foam boards from CVS as a light bounce held up by the HP box my laptop came in, towels, photo boards and props scattered about and the piece de resistance…a nice big window that gets light from about 9-6pm. This room is in a constant state of disarray with the curtain always pulled back, the chairs away from the table and crumbs from shoots all over the floor. Ginger likes it in there.
And the finished product being used:
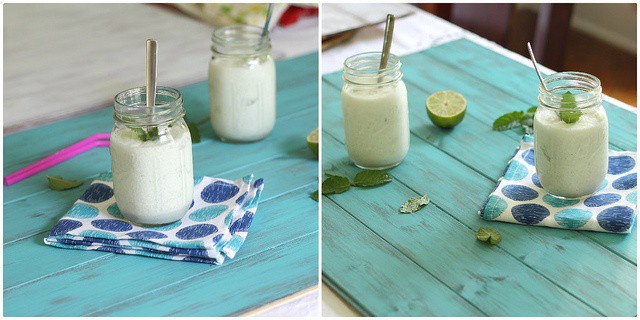
Funny how much the color of that smoothie changes when I switch the side of the table I’m taking the picture from, isn’t it? Independently you would probably never notice, but side by side it’s quite apparent. And that’s why I end up with 45 pictures of the same thing and eyes bugging out of my head while editing at 9pm every night.
Gina Matsoukas is an AP syndicated writer. She is the founder, photographer and recipe developer of Running to the Kitchen — a food website focused on providing healthy, wholesome recipes using fresh and seasonal ingredients. Her work has been featured in numerous media outlets both digital and print, including MSN, Huffington post, Buzzfeed, Women’s Health and Food Network.


Ohh this is so awesome!! Any possible chance you remember the name of the turquoise paint sample? I’ve been searching for the right turquoise now for months and I’m pretty sure that’s perfect.
Oh gosh, I do not. It’s been years and I’ve since thrown the paint out – sorry!
Very helpful dear, I was just thinking to buy a board and put colour on the other side for 2 in one usage.
What an awesome tutorial! For everyone’s reference, you can often find these boards in the clearance section bin at Home Depot and Lowe’s sometimes. It doesn’t hurt to look there!
Loved the post. I just went out and got the blue and white and totally forgot the brown. Off now to get that.
I have had this post in my pinterest board for a long time. I finally decided to do it and I am so happy with the outcome! I really appreciate you putting all the details from the steps to the exact items to purchase. I posted a couple of images on facebook would love for you to take a look and see what you inspired.
http://www.facebook.com/moonreflectionsphotography
Thanks again!
Sacred
So glad I found your site and this post. I have been trying to find a distressed wood base to use to photographs. Making my own seems easier than searching all over Pennsylvania!
LOVE this! Thanks for the tip!!